YPRES SALIENT - Hill 60 - Zwarte Leen - Hollebeke Bunkers - St. Elooi Mine Craters - Lankhof Farm Bunkers
Years of visit: 2005, 2006, 2016
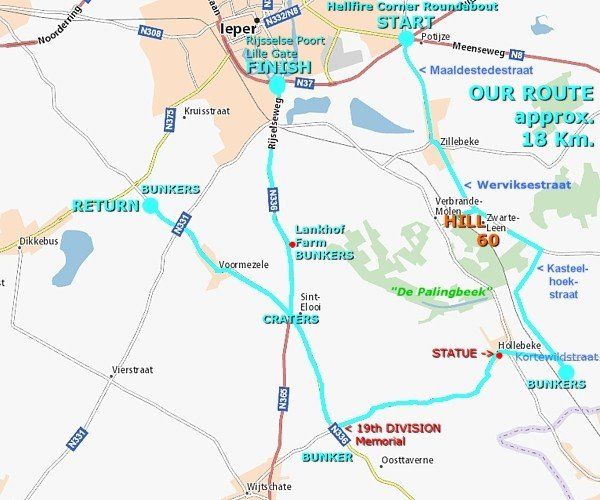
We depart from the Hellfire Corner roundabout, south-east of Ypres, to drive southward to Zillebeke. We pass the village of Zillebeke for our first stop at the hamlet of Zwarte Leen to visit Hill 60. From there we continue southward to Hollebeke to visit some German bunkers. From Hollebeke we continue south-westward to the Oosttaverne junction for the Butterfly memorial of the 19th (Western) Division. From there we drive northward to St. Elooi and its mine craters. From St. Elooi we visit some British bunkers near the village of Voormezele. From Voormezele we return to St. Elooi to visit north of the village the British Lankhof Farm bunkers. In between I will explain briefly in several illustrated frames the background of these sites, mainly dominated by the underground war.
From the Hellfire Corner roundabout, south-east of Ypres, we drive southward to pass Zillebeke to stop at the hamlet of Zwarte Leen.
Zwarte Leen is often also spelled as Zwarteleen, Zwartleen, or Zwarte-Leen.
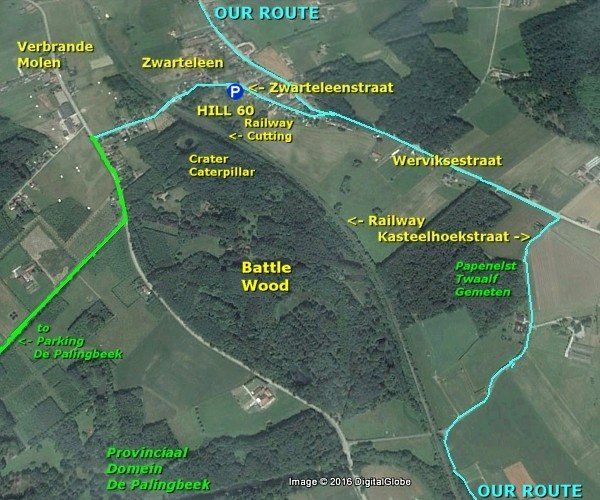
We park our car at the parking, north-east foot of Hill 60 , but we prefer to enter the terrain from the northern entrance at the Zwarteleenstraat.
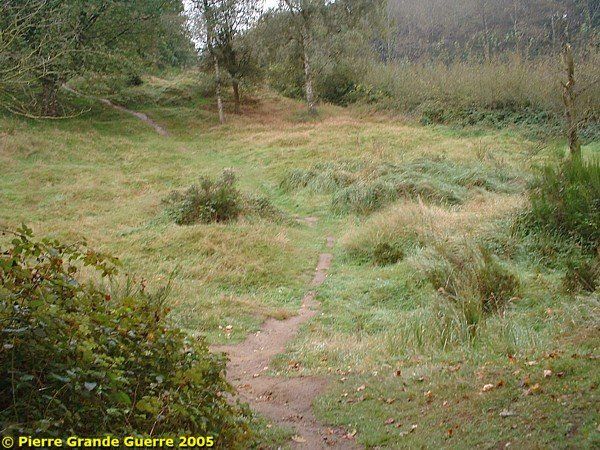
The relatively small terrain of Hill 60 is dominated by mine craters and shell holes.
During April and May 1915 a battle completely changed the landscape of the hill.
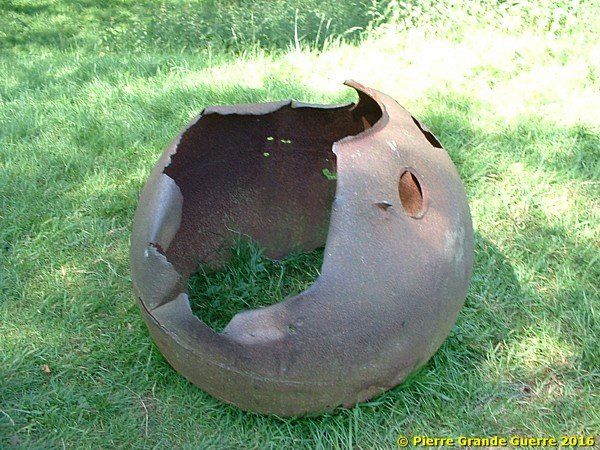
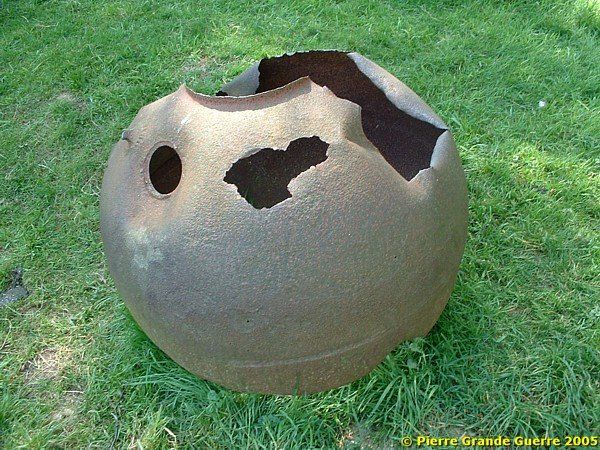
The first confrontation with the past: a relic of a large mine crater.
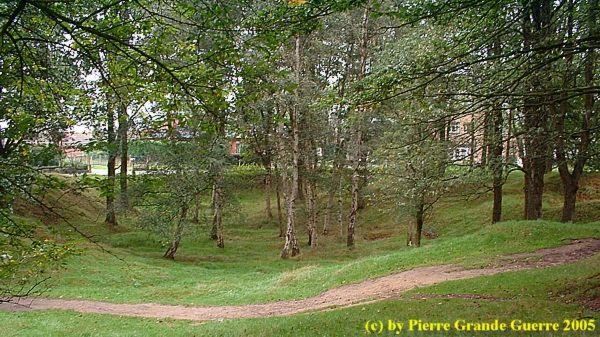
Mine warfare, hand grenade teams, and the release of chlorine gas were the main characteristics of the 1915 Battle of Hill 60.
Before we continue our exploration of Hill 60, first I shall briefly explain in the frame below the German capture of Hill 60 in November 1914.
| November 1914 - The 30th Infantry Division Captures Hill 60 |
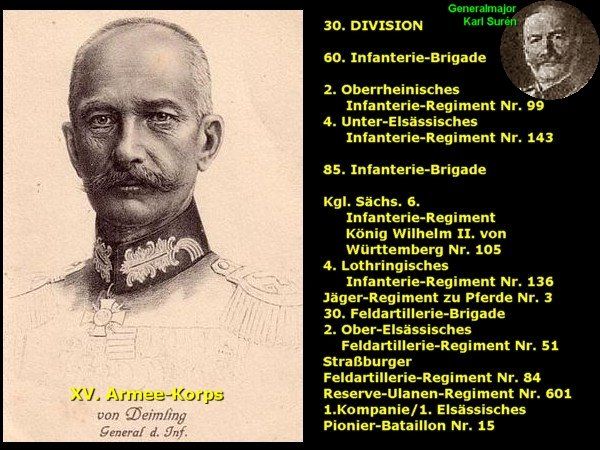
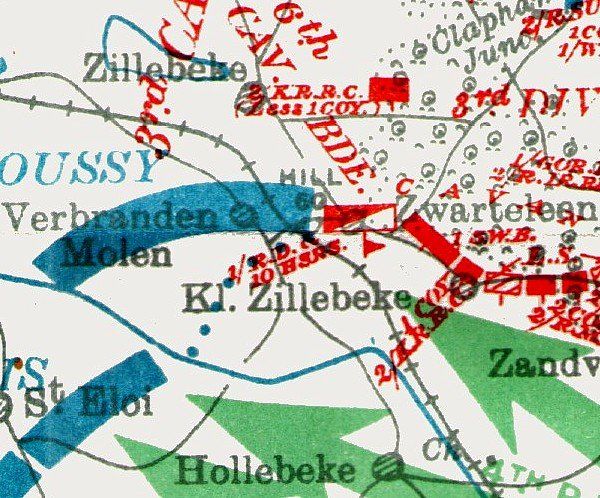
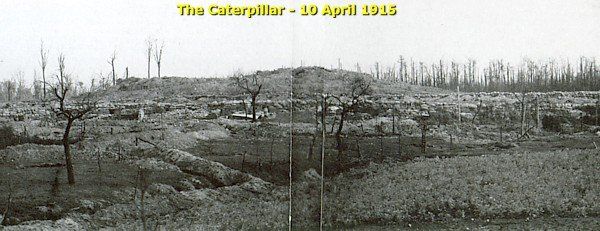
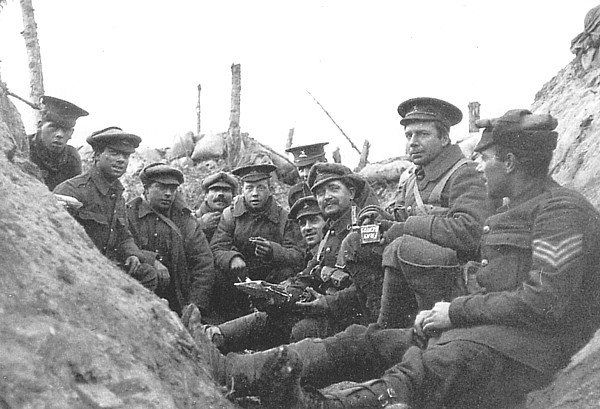
On 11 November, Generalmajor Karl Friedrich Surén’s 30. Infanterie Division , a component of General von Deimling’s XV. Armee-Korps , attacked a combined force of French and British horsemen in the area of Zwarteleen, Hill 60 and the Caterpillar on the southern side of the railway cutting.
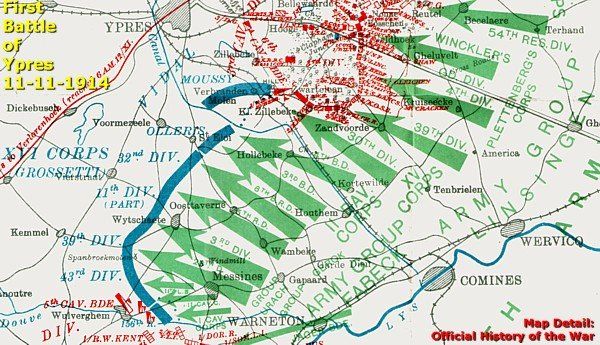
Horsemen of the French Groupe de Cavalerie Moussy of the XVIe Corps d’Armée and of the British 6th Cavalry Brigade were forced to withdraw to the west and leave Hill 60 and the Caterpillar to the 30th Infantry Division. Immediately this Division dug trenches on these hills, and it consolidated and fortified its positions.
The 30th Infantry Division, from 17 December 1914 under Generalleutnant Friedrich von Gontard , ...

... had now the strategic advantage of the possession of these two hills.
We continue our exploration on the hill.
On the north-east side of the hill stands this bunker.
Before we continue, in the illustrated frame below I explain the underground warfare on this site and the Battle of Hill 60.
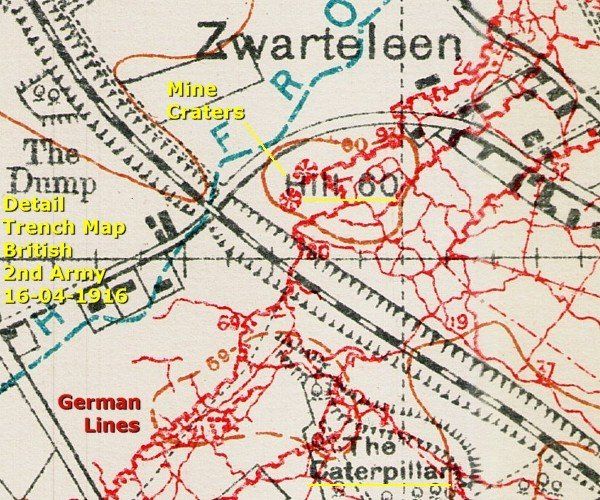
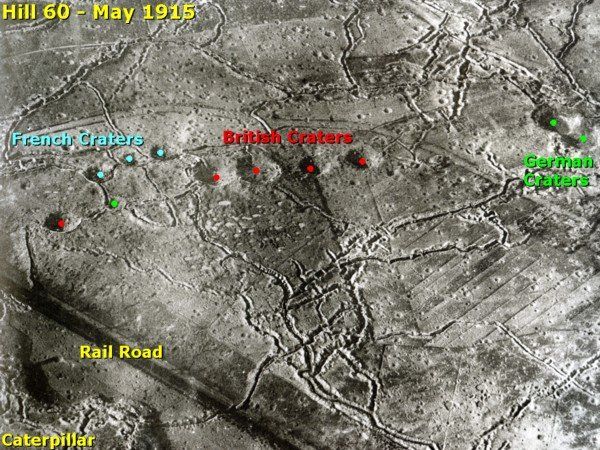
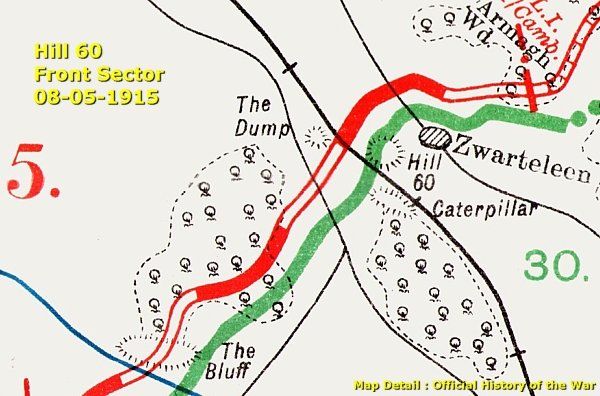
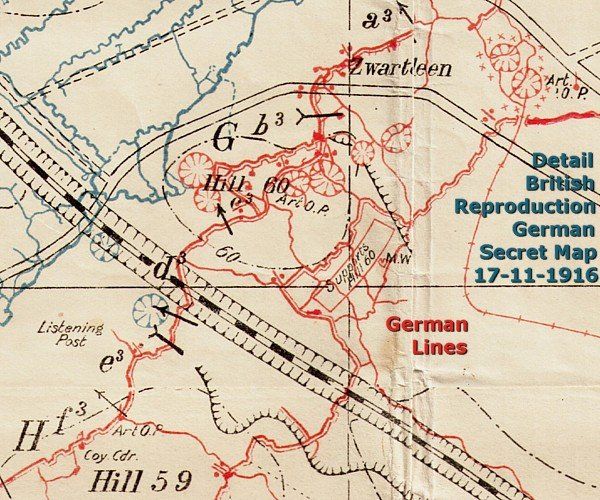
| The Battlefield - Hill 60 and the Caterpillar |
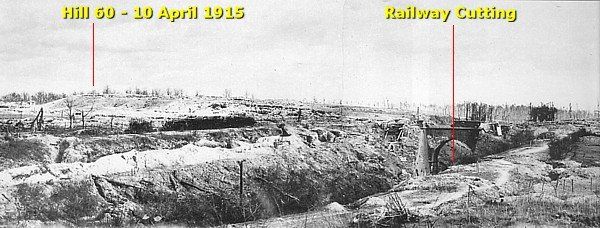
Originally Hill 60 (60 m.) and the Caterpillar (59 m.) were spoil heaps, a by-product of the construction of the railway cutting running along the heights.
The 30th Infantry Division would defend this front sector until January 1916.
The British 5th Infantry Division

Two Brigades of the British 5th Infantry Division were positioned on the lower lands and the only other spoil heaps in the north-west and west, respectively The Dump and The Bluff.
Mine Warfare in the Ypres Salient

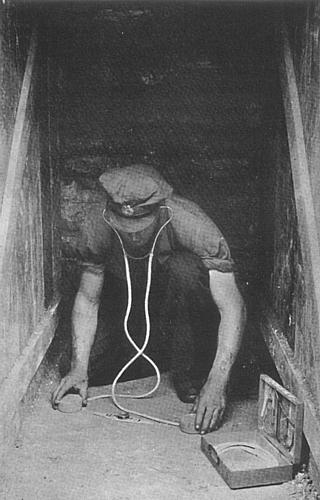
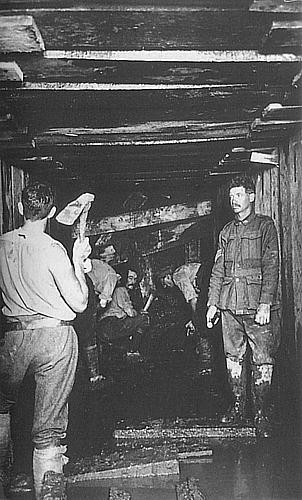
From March 1915 underground warfare, tunnelling and mining, was an extended activity of both belligerent parties , near Bellewaerde, Hooge, Hill 60, Hill 62, and Messines. Mine warfare caused cruel man-to-man fights in pitch dark, narrow and low tunnels. The main goal of mining was to bring a large amount of explosives under an enemy position to blow it up at a specified time. Of course, the enemy was constantly listening and counter-mining.
Battle Preparations
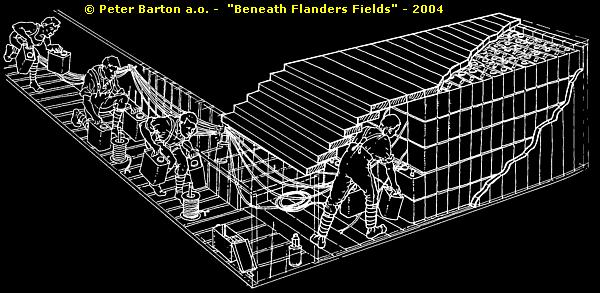
Early March the Royal Engineers 173rd Tunnelling Company started on orders of Major-General Sir Edward Bulfin , commander of the 5th Division , to dig three, 5 m. deep, tunnels with a length of more than 90 m. towards the German first line. Via these tunnels the company installed six mines: two mines in the north, each charged with 910 kg of explosives, the two mines in the centre contained 1,200 kg charges, and the southern mines contained 230 kg. of gun cotton.
The Tunnellers abandoned the work on one of these southern mines, when they detected a nearby German counter-mining gallery.
Major-General Bulfin planned an infantry attack with the 13th Brigade of the 5th Division to be opened with an unexpected surprise for the defending company of the Saxon Königliche Sächsischer 6. Infanterie-Regiment König Wilhelm II. von Württemberg Nr. 105 (I.R. 105). The Saxon I.R. 105 was a component of the defending 30. Infanterie Division.
Battle of Hill 60 – Two Stages
The Battle of Hill 60 has two stages, interrupted by a period of 7 days, from 22 April to 30 April. During the first stage the British 13th Brigade initiated the battle and during the second stage the Germans took the initiative.
First Stage - 17 April 1915 - Mine Detonations
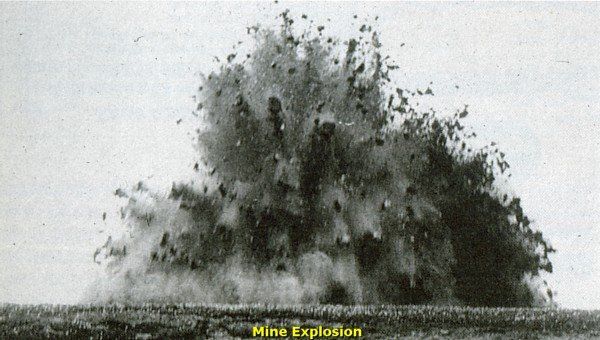
On 17 April at 7:05 PM, Engineers of the 173rd Tunnelling Company detonated the first pair of mines and ten seconds later the others. Debris scattered some 100 m. upward and in all directions up to a range of 300 m.. The explosions and the debris even caused some casualties to the battalions of the 13th Brigade, ready for the attack.
The explosions destroyed largely the opposing company of I.R. 105. The survivors were disorientated by the shock. The Royal West Kents attacked with fixed bayonets. The few Saxons, who still tried to resist, were killed. Twenty Saxons were taken prisoner, 150 soldiers killed. The 13th Brigade lost only 7 casualties. Immediately after the fight the British began to consolidate their newly captured trenches. The German artillery retaliated bombarding the British troops on Hill 60 with high explosive shells.
18 April German Counter-Attacks
On 18 April at 4:00 AM, the Germans deployed three counter-attacks with mainly hand grenade teams sustained by enfilading machine-gun fire from the Caterpillar, Zwarte Leen, and Shrewsbury Forest. The German attacks continued all day and forced the British back to the west side of the hill. At 6:00 PM, two British battalions counter-attacked and managed to capture the entire hill.
19 April – 21 April
On 19 April, the 15th Brigade relieved most of the 13th Brigade. The artillery of the 30. Infanterie Division continued to bombard the hill. On 20 April at 6:30 PM and 8:00 PM, the 30. Infanterie Division attacked again and continued to attack.
At dawn on 21 April, two and a half companies of the Queen Victoria's Rifles were ordered up to the front line. Soldiers of the German 2. Oberrheinisches Infanterie Regiment Nr. 99 ( I.R. 99 ) attacked, again mainly with hand grenades. Casualties of the Rifles were extremely serious. Two officers, Major Lees and Lieutenant Summerhays, were killed.
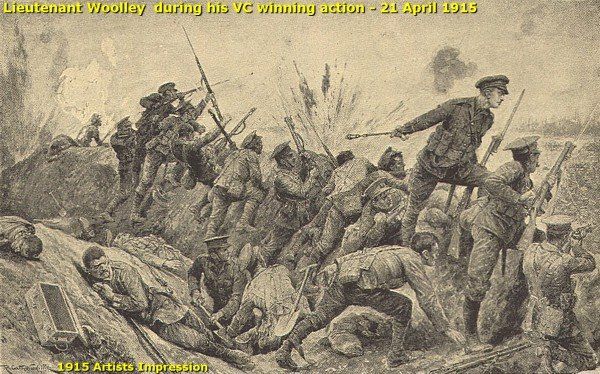
Only 40 soldiers were left in the front line. It was then that Lieutenant Geoffrey Woolley took over command. He rallied the troops and encouraged them by promising the men that reinforcements were on the way. Woolley's intervention helped to repulse the counter-attack; he threw hand grenades at the advancing Germans. For this gallantry Lieutenant Woolley was awarded the Victoria Cross.
For the time being the British were able to hold the hill.
22 April – First German Gas Attack - Gravenstafel Ridge
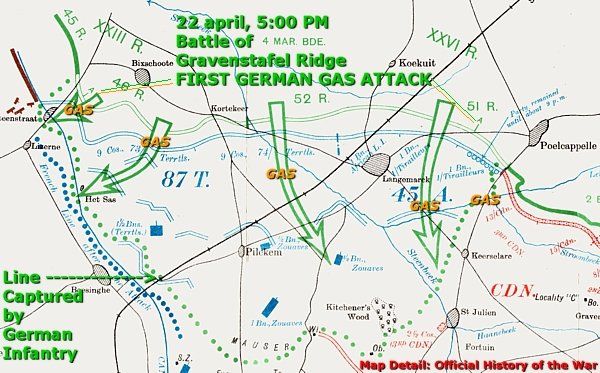
On 22 April, the focus on Hill 60 was abruptly shifted. From 5:00 PM the British were forced to pause their planned attacks. From 5:00 PM General Sir Herbert Plumer and his Second Army had to focus on a front sector farther north, north and north-east of Ypres. West of Poelkapelle, on Pilkem Ridge and Gravenstafel Ridge near St. Juliaan, the first German gas attack ever struck troops of the French 87e Division d'Infanterie Territoriale, the Algerian Zouave troops of the 45e Division d'Infanterie and troops of the 13th Battalion of the Canadian Expeditionary Force . These unexpected gas attacks formed the opening of the Battle of Gravenstafel Ridge, to be continued as the Second Battle of Ypres (22 April – 25 May 1915). The chlorine gas and the following German infantry attack forced a deep gap, 6 km. wide, in the Allied front north of Ypres.
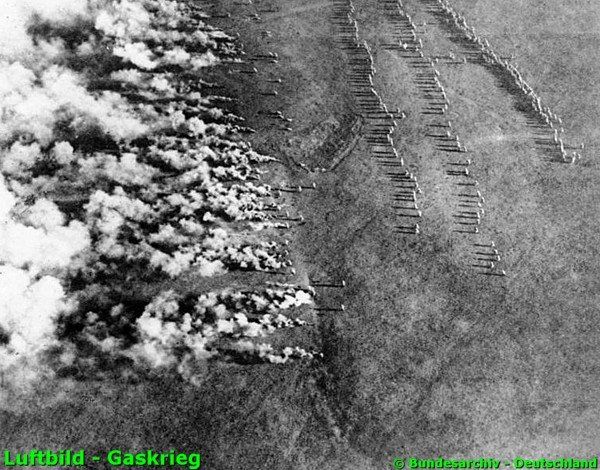
Second Stage - Battle of Hill 60 - 1–7 May – Chlorine Gas
On 1 May the 30. Infanterie Division resumed its attacks on Hill 60 with the release of chlorine gas on the troops of the 15th Brigade on Hill 60. After a preliminary artillery bombardment the Germans released the gas at 7:00 PM from positions less than 90 m. away from Hill 60 on a front of 400 m. wide. As soon as the gas reached the British positions, the German grenadiers attacked from the flanks. Simultaneously their artillery laid a barrage on the British communication lines to the hill.
In spite of the gas and in spite of many casualties, some of the British returned fire. Even under the artillery barrage reinforcements arrived through the gas clouds just in time to force the Germans back.
5 May – Three Gas Attacks
On 5 May the Germans released chlorine gas on Hill 60 three times: at 8.45 AM, at 11.00 AM and 7:00 PM. Fifteen minutes after the first gas discharge of 8.45 AM the infantry of the 30th Division advanced behind the gas cloud. The troops occupied nearly all of the front line on the lower slope of the hill.
British reinforcements arrived and fought their way up a communication trench. Two more battalions were sent up.
At 11:00 AM the Germans released more gas at the north-east side of the hill. The gas cloud overwhelmed the right flank of the British defence. But still enough men survived to resist the German infantry until 12:30 AM, when a reinforcement battalion arrived advancing under an artillery barrage and through the still present gas. The British counter-attacks forced some of the Germans back. They even managed to re-capture several lost trenches.
But the Germans still occupied the top of the hill. At 7:00 PM, they released more gas followed by another infantry attack. This attack was stopped by rifle-fire.
At 9:00 PM, the 13th Brigade arrived with the mission to re-capture the hill. After a twenty-minute preliminary artillery bombardment the Brigade attacked at 10:00 PM.
After days of mine explosions and artillery bombardments Hill 60 changed into a barren wasteland of mine craters and shell holes. The advance in the dark broke down under pressure of enfilading machine-gun fire from the Caterpillar and from Zwarte Leen. At 1:00 AM this machine-gun fire finally forced the troops to withdraw.
There were six days of heavy fighting: artillery fire, gas, machine-gun fire, and close combats with uncomfortable and unreliable gas masks. The stress exhausted both parties. During the night both parties dug in trying to consolidate their positions.
7 May - Last British Attack
On 7 May at dawn, the British attacked Hill 60 for the last time with two companies and attached teams of grenadiers. The attack was completely in vain, as all of these soldiers were killed or captured.
Finally the staff of the 5th Division came to the conclusion that Hill 60 was untenable, unless at least the Caterpillar was also occupied. After the failed attack of 7 May the Battle of Hill 60 came to an end.
The Aftermath - Casualties
British casualties of the First Stage of the Battle: In the attack on 7 April, the British lost only seven casualties. From 17 to 19 April the casualties of the 13th Brigade were 1,362 men.
Second Stage of the Battle: On 1 May, the 1st Battalion of the Dorsetshire Regiment lost over 90 men to gas poisoning; 207 were brought to dressing stations, where 46 men died immediately and another 12 men died later; the battalion had only 72 survivors! The 1st Battalion of the Bedfordshire Regiment, having recently taken on many fresh and inexperienced replacements suffered similarly.
From 1 to 7 May the 15th Brigade lost 1,586 casualties.
The 5th Division counted a total of 3,000 losses. Of 2,413 wounded British admitted to dressing stations and hospitals, 227 men died.
German casualties : Alas, the German casualty numbers of the 30. Infanterie Division and XV. Armee-Korps are less exact. These are estimated for the whole period of the Battle of Hill 60 as having been 800 - 1,000 men.
Before the war would be over, the possession of Hill 60 would be contested another three times.
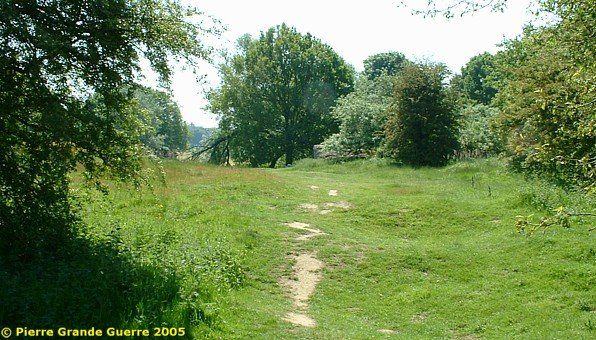
View of the north-west side of Hill 60. Above right the vegetation hides the railway cutting below. The trees in the background are Caterpillar trees.
On top of Hill 60: relics of a bunker.
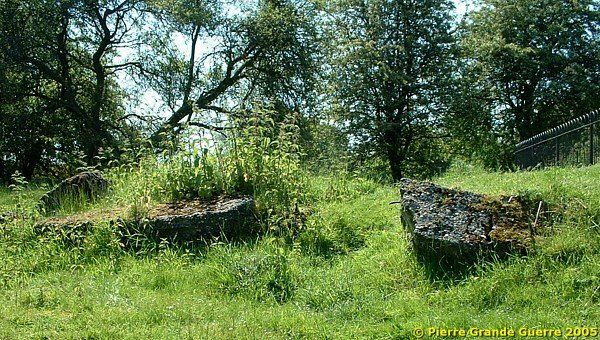
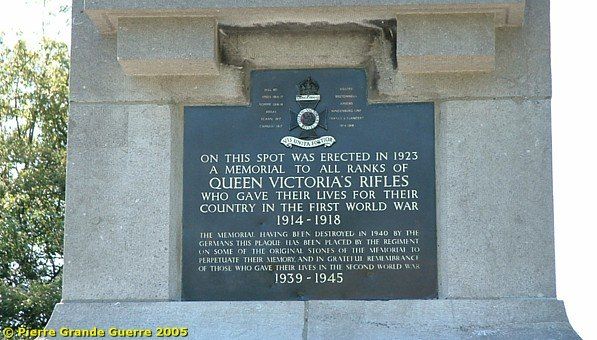
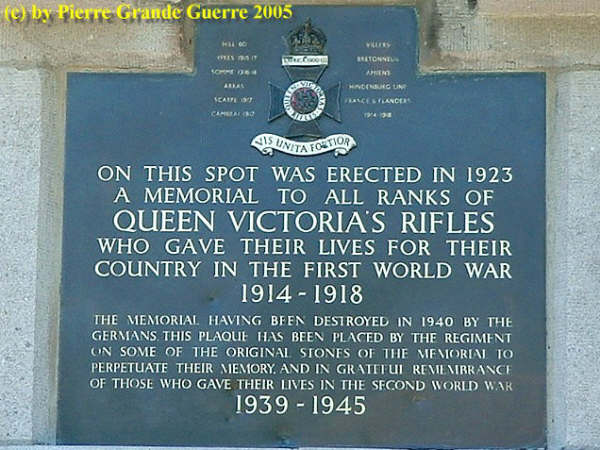
Next to it, on a height of 60 m., stands the memorial for the Queen Victoria’s Rifles.
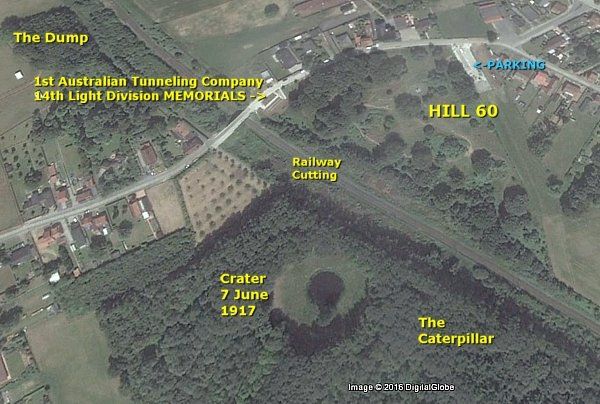
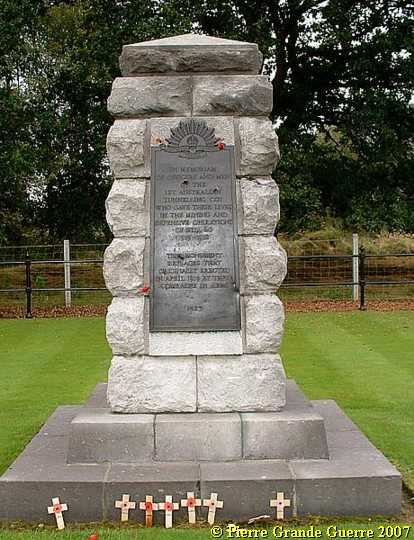
We leave Hill 60 via the northern exit and walk the Zwarteleenstraat down in the direction of the narrow bridge over the rail road. Here we find two memorials next to each other.
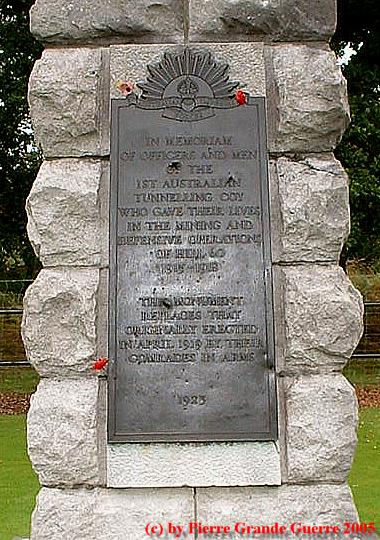
The first memorial commemorates the 1st Australian Tunnelling Company , responsible for two mine detonations here on 7 June 1917.
Mine Warfare Continues – August 1915
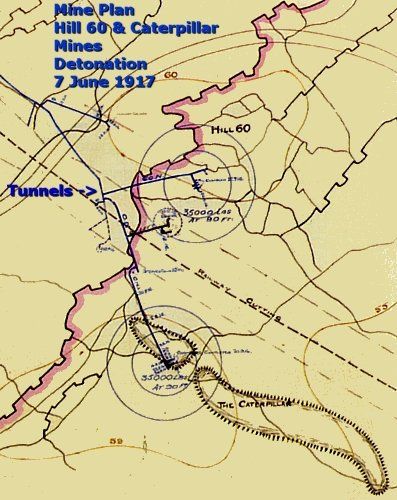
Mine warfare beneath Hill 60 continued from 3 August 1915. The 175th Tunnelling Company began to dig a tunnel behind the front line of 200 m. at a depth of 27 m. The branch tunnels from this gallery ran beneath German galleries. In April 1916 the 3rd Canadian Tunnelling Company took over the works and completed the tunnels. In July 1916 the 3rd Canadian Tunnelling Company positioned a mine of 24,200 kg of explosives beneath Hill 60. In October the company installed via a branch tunnel a mine of 32,000 kg under the Caterpillar.
Constructing these tunnels and later the maintenance of the charges (mainly to keep the explosives dry) was continuously in danger of German counter-mining attempts to blow these galleries.
November 1916 - 1st Australian Tunnelling Company
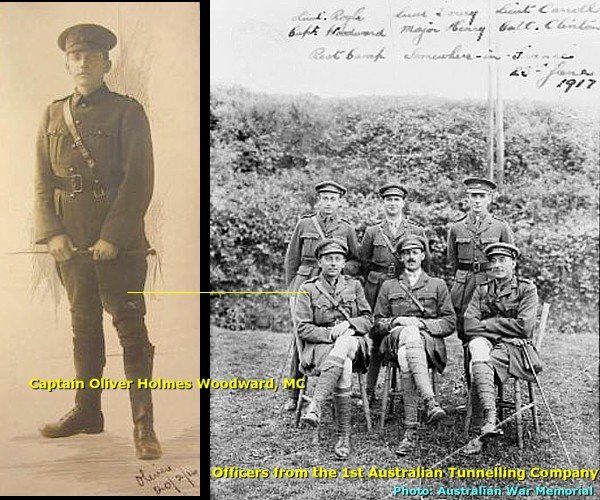
In November 1916 the 1st Australian Tunnelling Company under Captain Oliver Woodward took over the maintenance of these mines.
In the southern half of the Ypres Salient, tunnellers prepared the simultaneous detonation of 19 mines, starting the Battle of Messines Ridge on 7 June 1917 . On this date Captain Woodward detonated at 3:30 AM the Hill 60 and Caterpillar mines.
Woodward’s detonations annihilated almost the German companies on these hills of the Württemberger Infanterie Regiment 413 ( I.R. 413 ), a component of the 204. (Württembergische) Infanterie Division ( 204. I.D. ). During the following battle the British re-captured Hill 60.
(The recommendable film, “ Beneath Hill 60 ”, gives a profound impression of the activities of Woodward and his Australian Tunnellers and the constant dangers of German counter-mining during the underground war.)
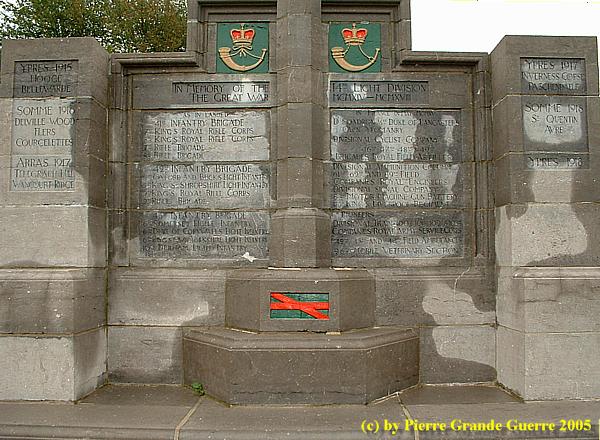
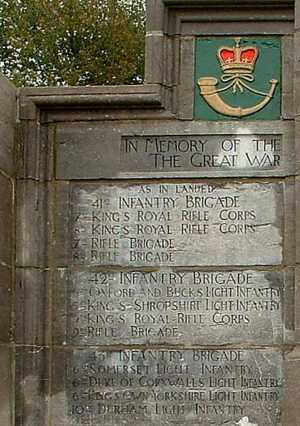
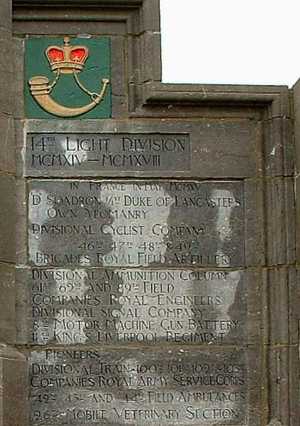
Next to the bridge over the railway stands the Memorial for the 14th (Light) Division . The memorial has been relocated from Railway Wood to Hill 60.
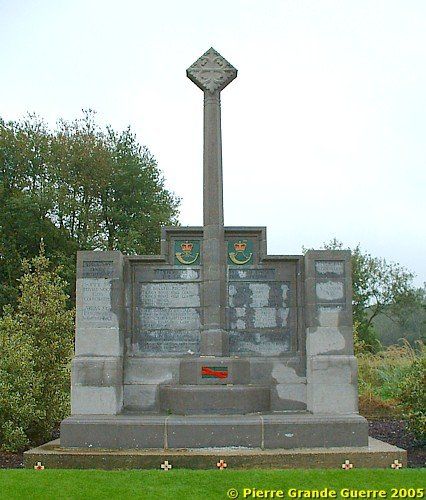
On 30 July 1915 the 7th Battalion King’s Royal Rifle Corps of the 14th Light Division was attacked by flamethrowers at Hooge . It was also involved in the Second Battle of Bellewaerde of 25 September 1915.
After taking part in several battles at the front in France the Division returned in 1917 to the Ypres Salient to take part in the Third Battle of Ypres.
Before we leave Hill 60 to resume our trip behind the former German lines around Hollebeke, I recommend to you in the frame below an alternative route, a short detour, to visit by foot the Caterpillar Mine Crater.
| Extra Visit to the Caterpillar Crater |
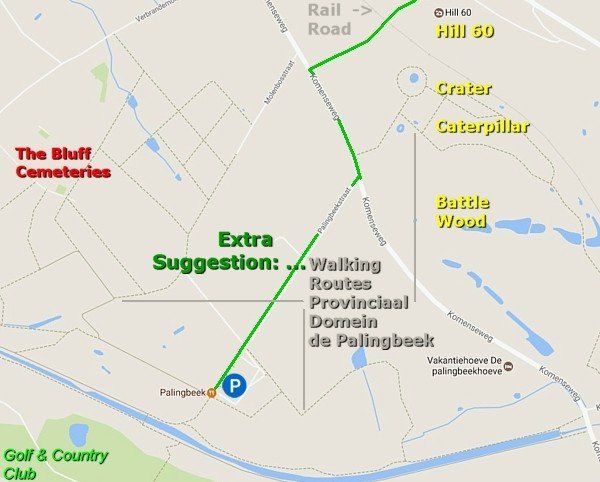
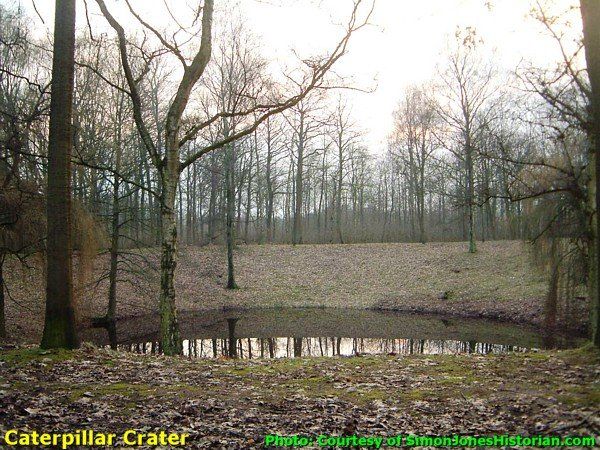
From Hill 60 you may continue southward by car to the parking of “De Palingbeek” Domains. From there you can explore on foot the Bluff and the Caterpillar Mine Crater. Unfortunately without a camera I walked with Spikey in September 1916 the interesting path to the Caterpillar Crater.
Simon Jones of simonjoneshistorian.com very kindly provided us with his photo of the crater.
After this visit you may resume our main trip by car from Hill 60 southward to Hollebeke . Via the Kasteelhoekstraat we continue southward.
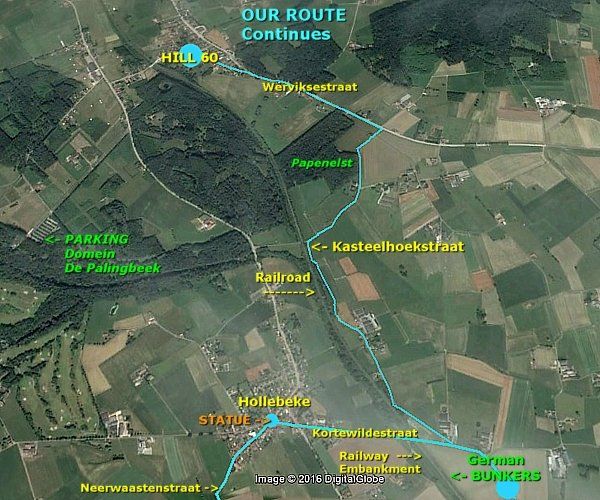
From November 1914 until June 1917 the Germans occupied this area and constructed here their defensive lines.
South of the site of the former Hollebeke Château we halt for a while.
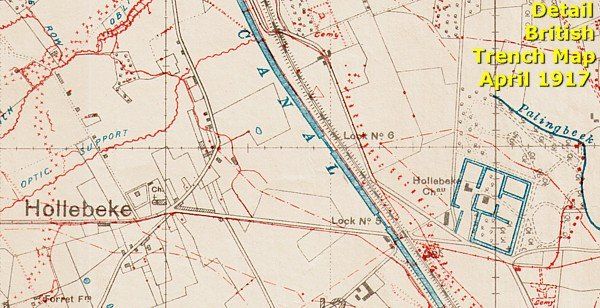
Hollebeke
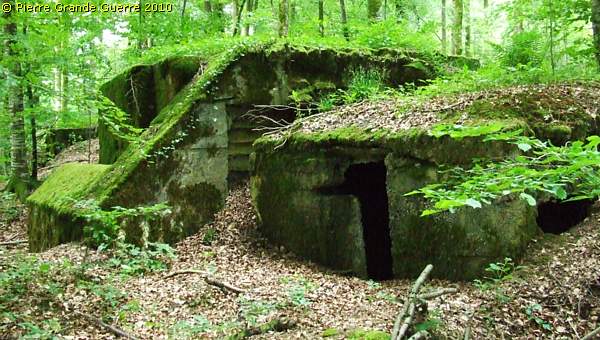
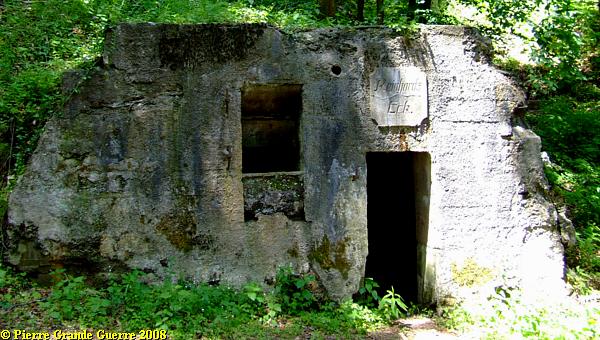
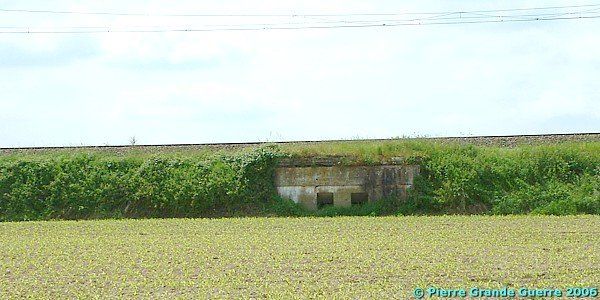
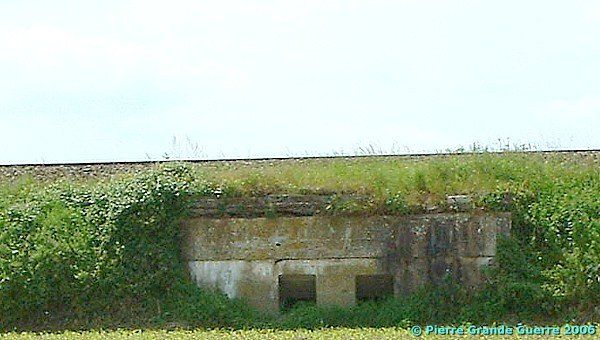
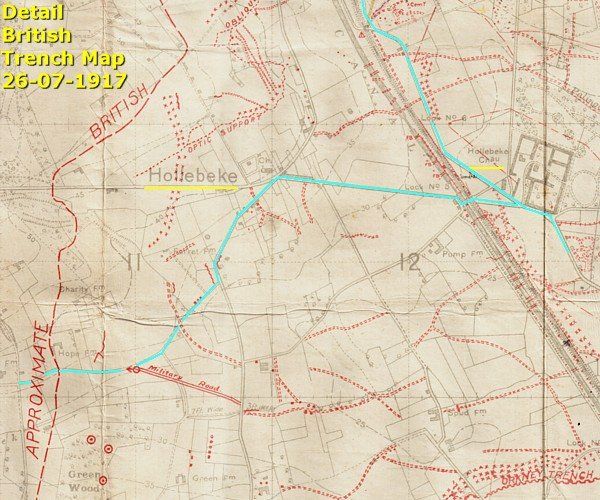
In the Kortewildestraat, east of the railway, south of the junction to the village of Hollebeke, we stop for bunkers, which the Germans constructed in the railway embankment.
We return to the junction and via a tunnel under the railway we continue westward to Hollebeke.
In the fields on the south side of the Kortewildestraat we find another set of German bunkers.
We continue to the centre of Hollebeke to the Eekhofstraat.
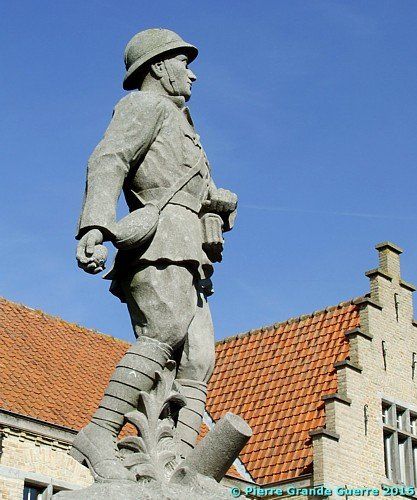
At the foot of the village church of Hollebeke, "O.L.Vrouw Geboortekerk", stands a statue of a Belgian soldier.
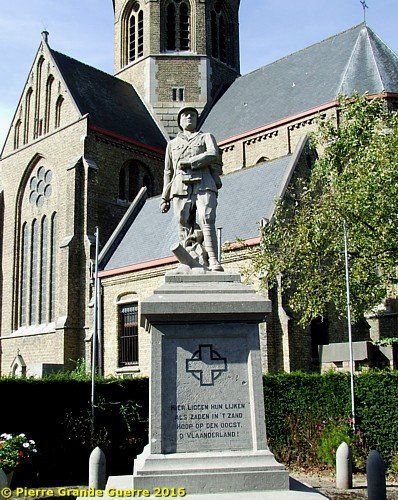
According to the inscriptions on the base it commemorates the civilian and military victims, inhabitants of Hollebeke, and the French soldiers killed here during the defence in October-November 1914.
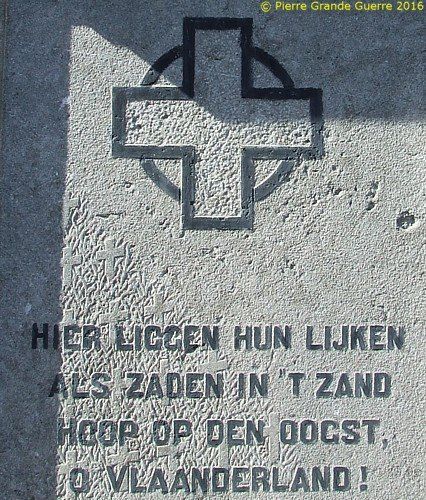
On the base we see 4 lines of the Flemish activist, priest and poet, Cyriel Verschaeve (1874-1949):
“HERE LIE THEIR CORPSES
LIKE SEEDS IN THE SAND
HOPE FOR THE HARVEST
OH, FLANDERS LAND!”
After the German capture of the village in November 1914, Hollebeke would be occupied until 7 June 1917. During that period the front line ran more to the west, west of Wijtschate. After the Battle of Messines of June 1917 the village was lying on the front line until 28 September 1918.
Oosttaverne Junction
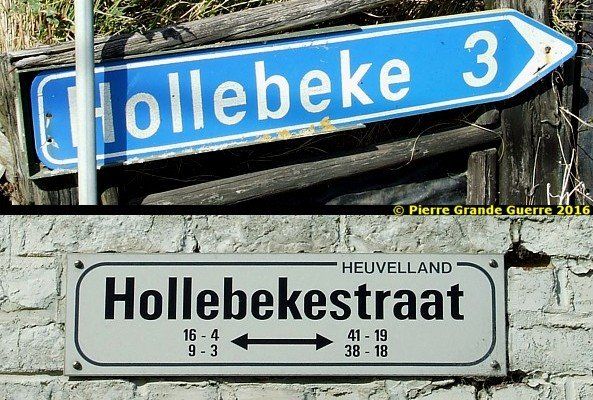
| From the statue we continue south-westward, ... |
... first via the Neerwaastenstraat and next via the Hollebekestraat, ...
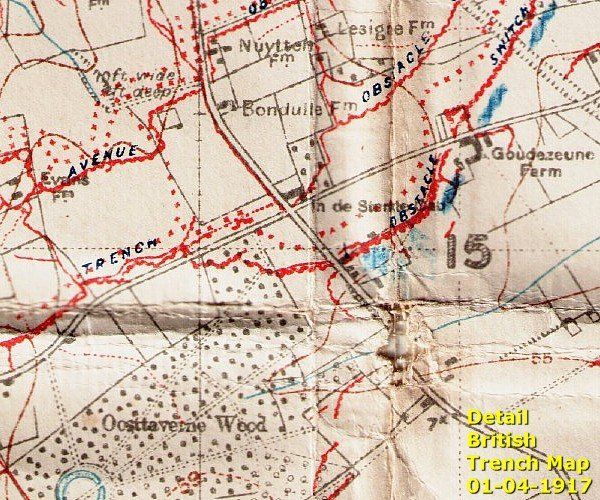
... to stop at the Oosttaverne junction with the Rijsselsestraat.
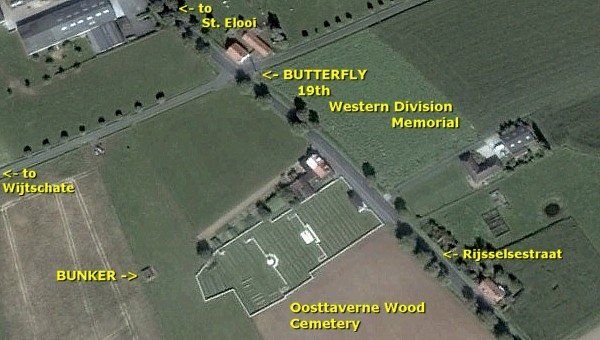
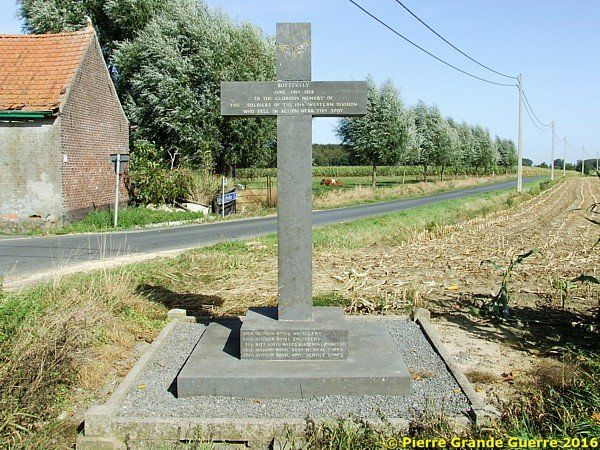
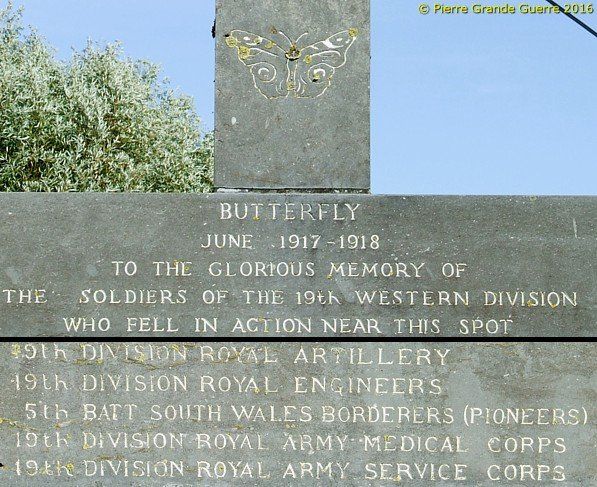
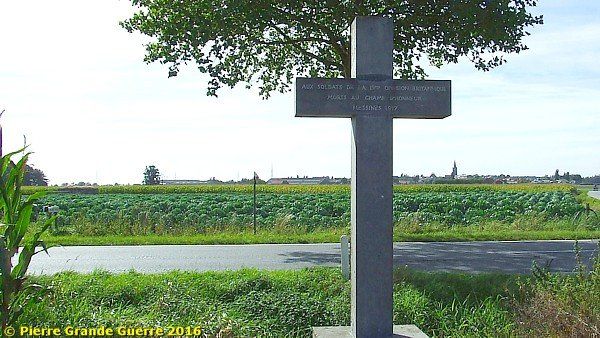
We stop at the Butterfly Memorial to the 19th (Western) Division commemorating its involvement during combats in this area, like the Battle of Messines Ridge of 1917, and the Division’s actions in 1918.
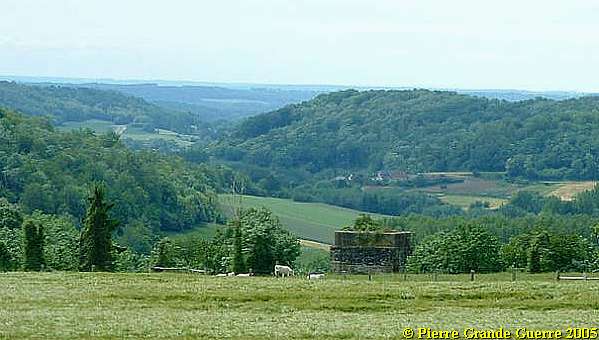
From the memorial a view westward. Left in the background a German bunker.
At the horizon right: the village of Wijtschate and its church tower.
The Oosttaverne Wood cemetery is nearby, so you might contemplate a visit to it. Along the road to Wijtschate we walk to the German bunker on the other side of the road.
We return to the Oosttaverne cross roads to continue by car via the Rijsselsestraat northward to St. Elooi.
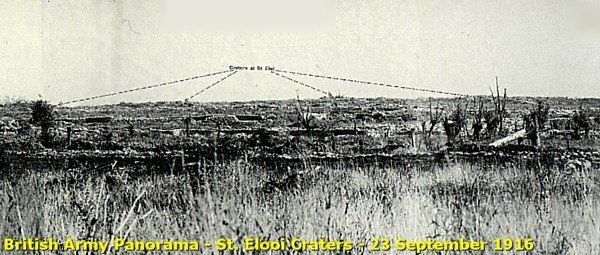
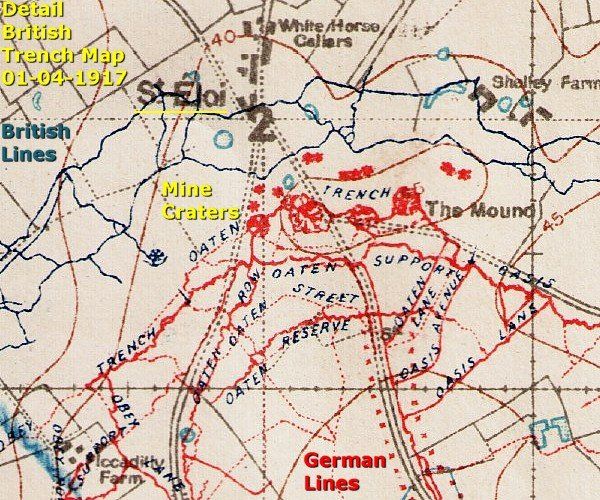
St. Elooi
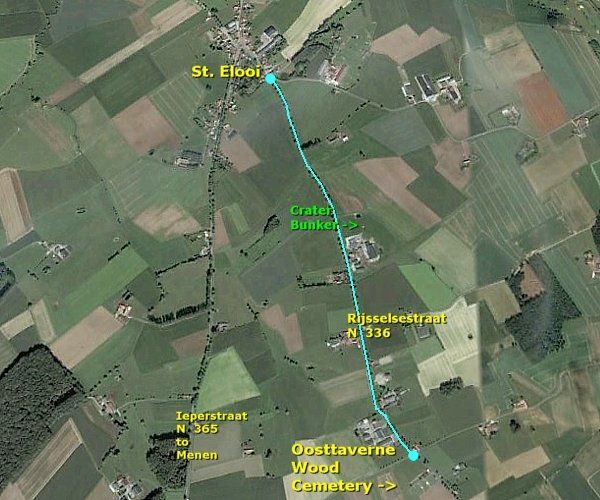
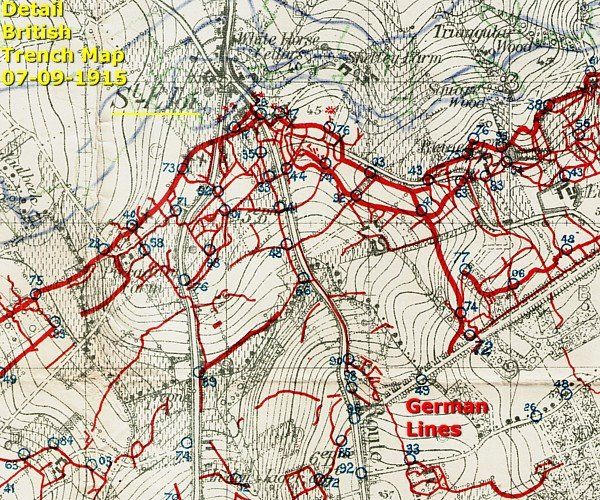
On both sides of this road, south of St. Elooi, the Germans occupied a small salient in the front line, which they reinforced with a complex trench system of 4 lines.
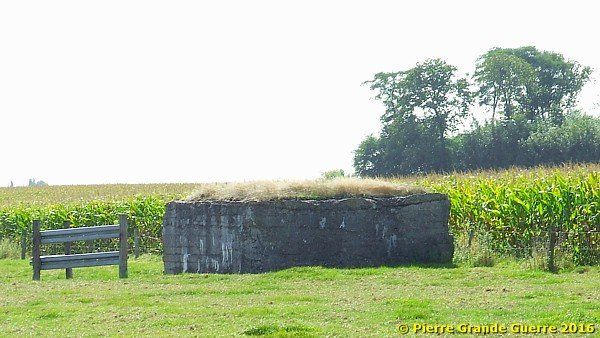
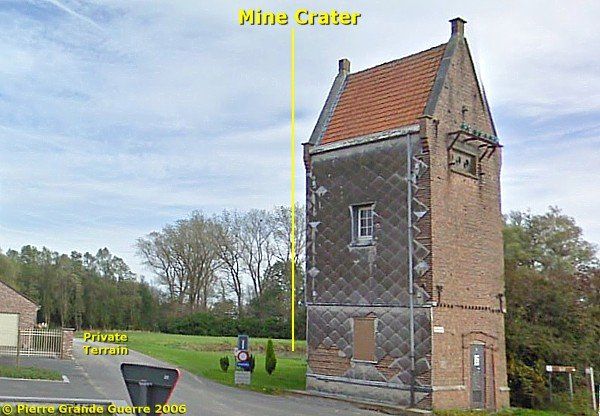
We pass a German 4th line bunker, east of the road.
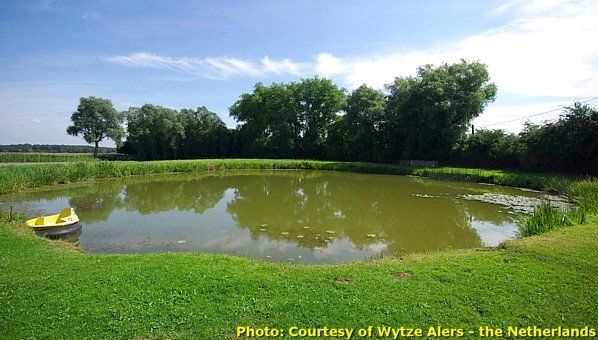
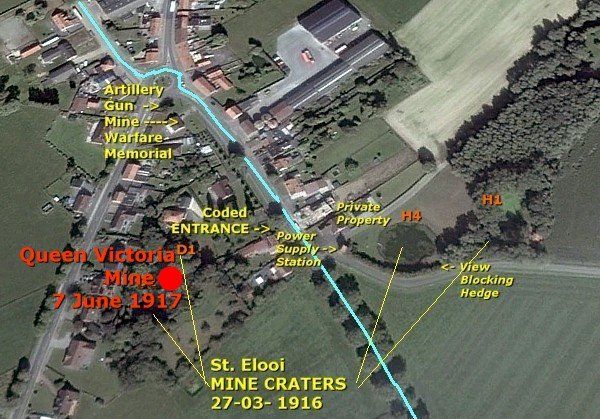
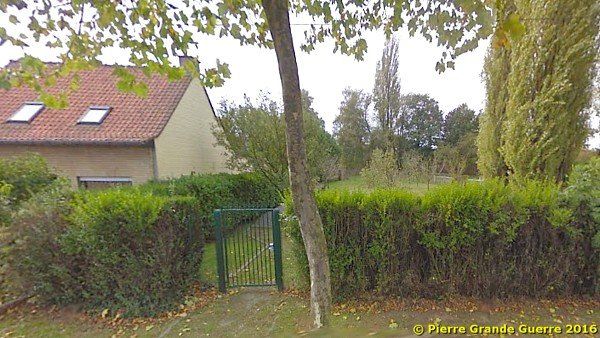
At the junction of the entrance of the village we stop to get a glimpse of the large mine crater hidden behind a hedge of a private garden.
Satellite photos often offer you a better impression of mine craters, more or less hidden in the landscape on private grounds.
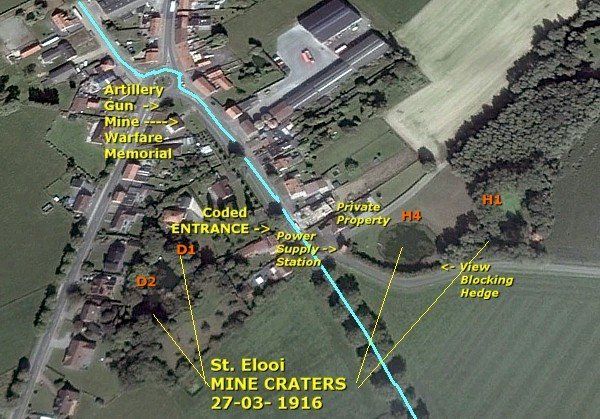
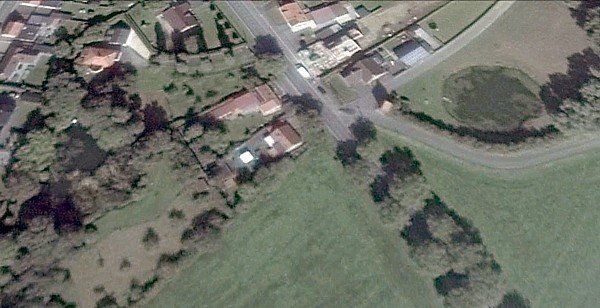
Out of respect for the privacy of the landowners you can only get a glimpse of the crater from the street.
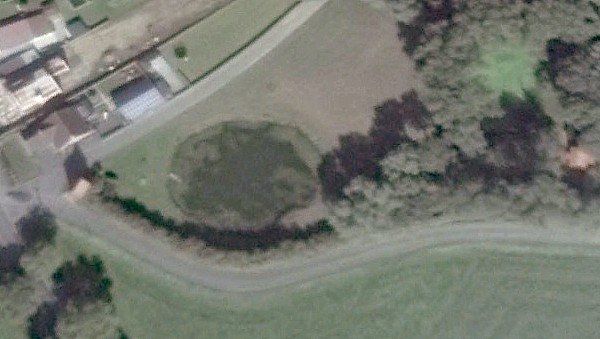
But my Dutch friend, Wytze Alers, very kindly provided us with his photo of the complete Mine Crater “H4”.
St. Elooi – 1915 - Underground War
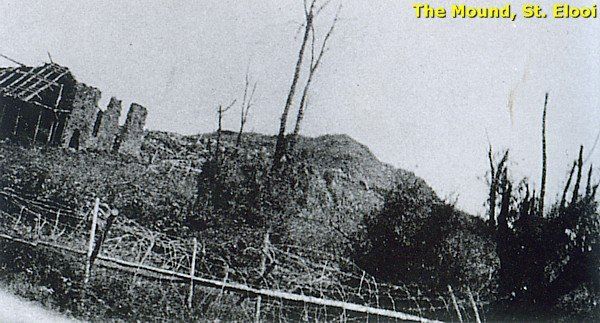
On 10 November 1914 the Germans captured The Mound, a spoil heap of 10 m. south of the village of St. Elooi. On 14 February 1915 the British captured The Mound.
German Mining Actions March / April 1915

On 14 March 1915, German “Mineure” detonated two mines under The Mound. During the following battle, the Germans attacked the village of St. Elooi. Defending units of the British 27th Division suffered some 500 casualties. On 17 March another German attack was a complete failure.
A month later, after an artillery bombardment of four days, the Germans blew another mine on 14 April at 11:15 PM, causing a crater of 20 m. wide. Under pressure of British artillery fire, they were not able to deploy a follow-up infantry attack to keep all their objectives. But the Germans kept the advantage of the height of the Mound. And so, the odd salient of St. Elooi was created.
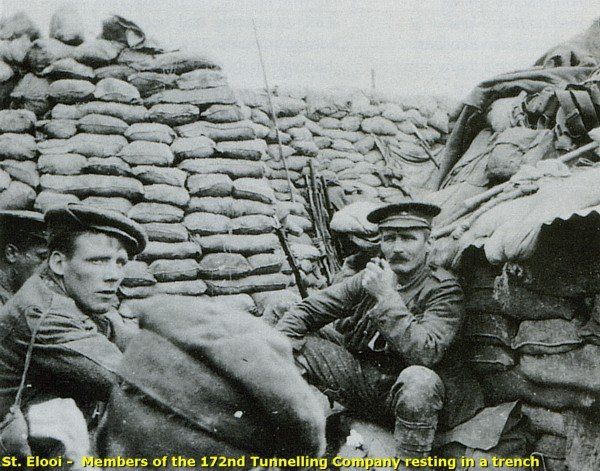
Spring / Summer 1915 - Hickling’s Counter-mining Actions
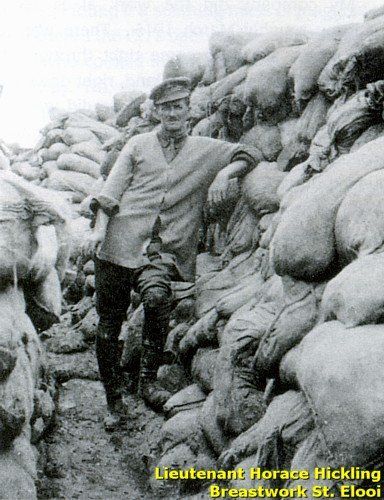
During the spring 1915 Lieutenant Horace Hickling’s 172nd Tunnelling Company started counter-mining.
A note by Major J. Norton-Griffith of the Royal Engineers offers an impression of Hickling’s counter-mining actions:
“The Germans have made repeated efforts to get at us. Hickling has blown them off each time. Since 14 April he has blown them on 23/4, 24/4, 3/5, 17/5, 26/5, 28/5, 5/6, 10/7.”
Summer 1915 – Installing British Mines
From the summer on, the 172nd Tunnelling Company constructed 5 galleries on a depth of 15 - 18 m. The central four tunnels reached under the German trenches. The two galleries on the outside finished under No Man’s Land. These craters in No Man’s Land were meant to provide later useful cover. The charges of ammonal were planned to be detonated as an opening of the Battle of St. Eloi at 27 March 1916, 4:15 AM.
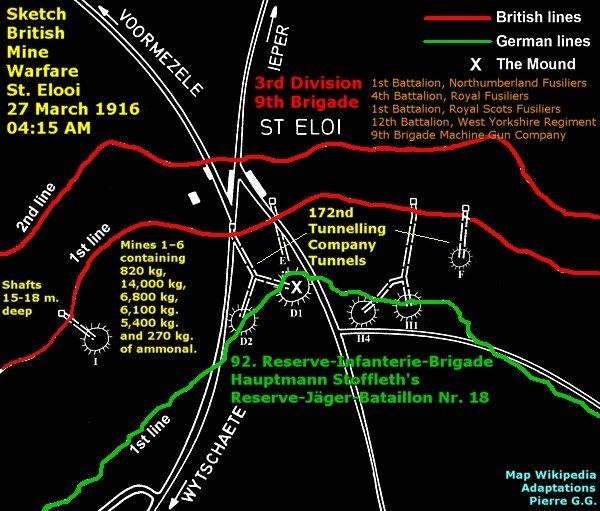
The Battle of St. Eloi (27 March – 16 April 1916)
The Opponents – The German 46. Reserve Division
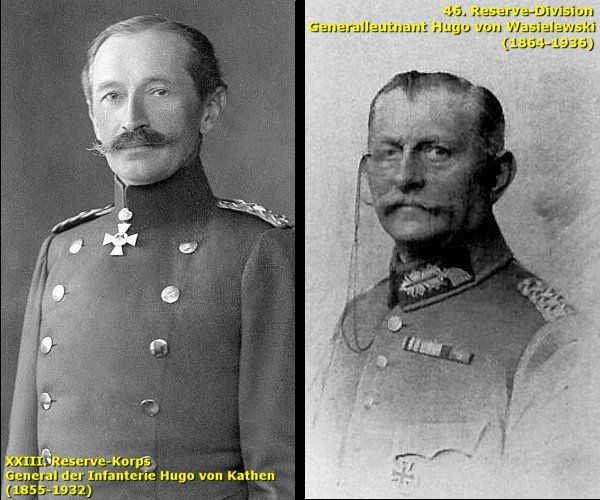
From 23 March 1915 the 92. Reserve Infanterie Brigade of the 46. Reserve Division under Generalleutnant Hugo von Wasielewski defended this St. Elooi salient with a maze of trenches of 4 lines deep. The 46th Reserve Division was component XXIII. Reserve Korps under General Hugo von Kathen .
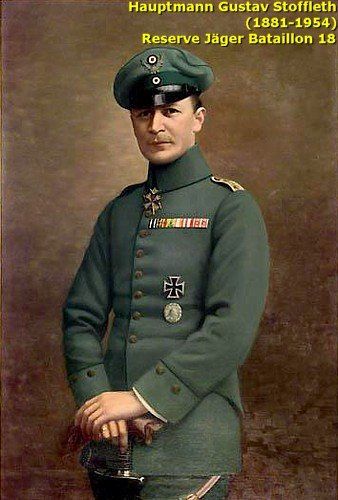
On 27 March 1916, Hauptmann Stoffleth ’s Ratzeburger Reserve Jäger Bataillon 18 (R.B.J. 18), a component of the 92. Infanterie Brigade, guarded the St. Elooi Salient. In the reserve stood the Reserve Infanterie Regiment 216 (R.I.R. 216).
The British 3rd Division
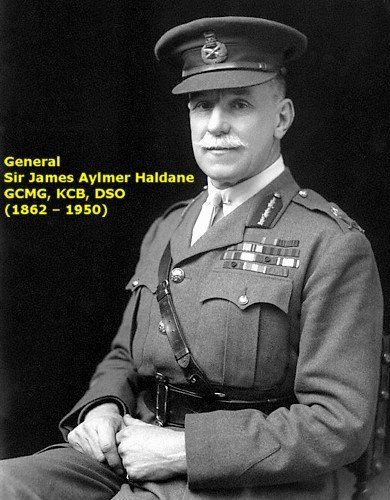
Opposite the 46. Reserve Division stood the British 9th Brigade of the 3rd Division under Major-General Sir James Aylmer Haldane , a component of General Sir Herbert Plumer’s Second Army.
27 March 1916
Before the battle broke out, also known as “ The Actions of St. Eloi Craters ”, there was no customary preliminary artillery bombardment. The goal was to maintain the surprise that would be gained by the explosion of the mines.
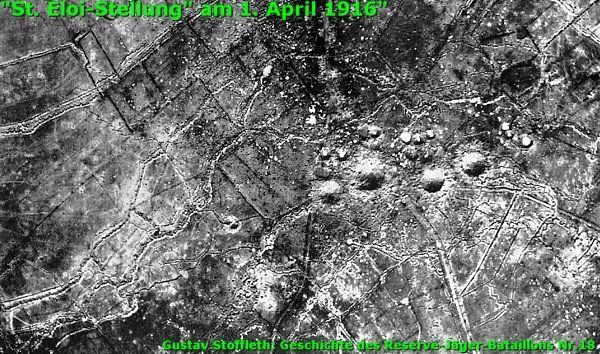
Mine Detonations
According to plan the 172nd Tunnelling Company detonated 5 mines right on time at 4:15 AM under the first line of the salient of Stoffleth’s Reserve Jäger Bataillon 18. Three hundred men of the Jäger Bataillon were lost. The explosions destroyed the German drainage system.
Infantry Attack of the 9th Brigade
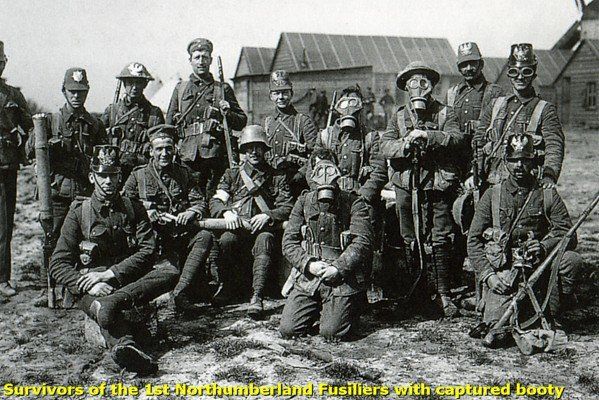
Simultaneously with the explosions the artillery of V Corps and the Canadian Corps opened a barrage to cover the infantry attack of the 9th Brigade of the 3rd Division. The 1st Northumberland Fusiliers and the 4th Royal Fusiliers were the first to attack. During the attack 201 men of the R.J.B. 18 were taken prisoner. The German artillery responded immediately, firing on the British trenches, No Man’s Land and the new craters. The 1st Northumberland Fusiliers suffered under this artillery fire. The 4th Royal Fusiliers were also struck by intense machine-gun fire. The casualties of the 4th Royal Fusiliers were 40 officers and 809 soldiers. The support battalions, 1st Royal Scots Fusiliers and 12th West Yorkshire, suffered also many losses from shellfire. In spite of these actions all objectives stayed in German possession. In the afternoon it started to rain heavily. In combination with the destroyed German drainage system the water flooded trenches, craters and shell holes, impeding the advance. The bad weather continued the days following.
28 March – 2 April
During the period from 28 March – 2 April from both sides, there were continual artillery barrages and infantry attacks for the craters. With support of units of the 45. Reserve Infanterie Division and 123. Infanterie Division the 3 battalions of the Reserve Infanterie Regiment 216 (R.I.R. 216) defended the lines and counter-attacked the British positions.
On the British side the troops of 13th King's, 2nd Royal Scots, the 8th East Yorkshire, the 2nd Suffolk, the 10th Royal Welch Fusiliers, and a company of the 18th Canadian Battalion from the 4th Canadian Brigade were involved in the combats for the craters.
3 April
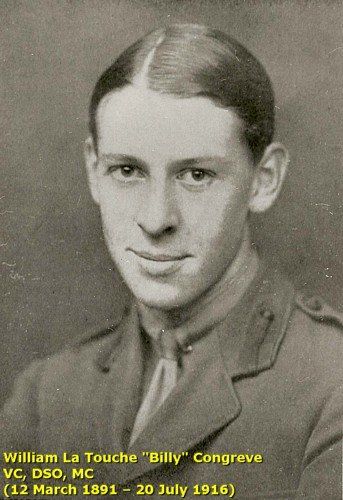
On 3 April at 2:00 AM, after a 1 hour bombardment the 8/King’s Own of the 76th Brigade captured crater H1. During this action Captain William “Billy” Congreve, Brigade-Major of the 76th Brigade, captured 5 officers and 77 men. Congreve wrote in his diary:
“Imagine my surprise and horror when I saw a whole crowd of armed Boches! I stood there for a moment feeling a bit sort of shy, and then I levelled my revolver at the nearest Boche and shouted ‘Hands up, all the lot of you!’ A few went up at once, then a few more and then the lot; and I felt the proudest fellow in the world as I cursed them”.
For this action Congreve was awarded the Distinguished Service Order.
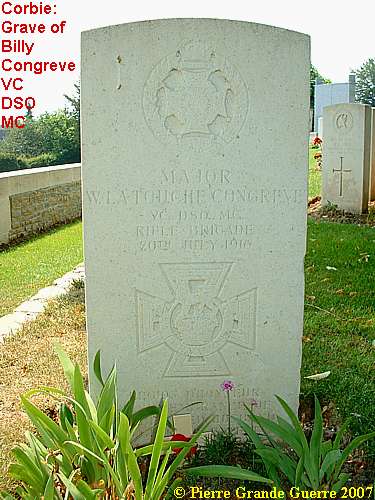
Later, on 20 July 1916, Congreve was shot by a sniper in Caterpillar Valley some 500 m. southward from High Wood in the Somme. For his brave actions in the Somme Congreve received the Victoria Cross posthumously. In 2007 we visited the spot near High Wood and Congreve’s grave at Corbie.
4 - 6 April
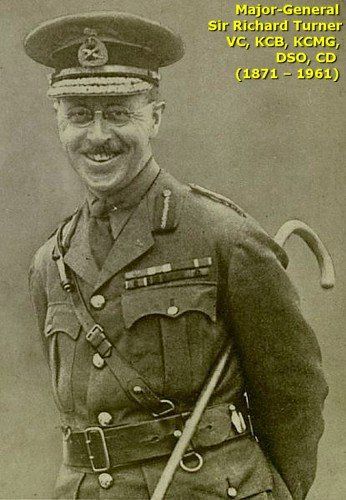
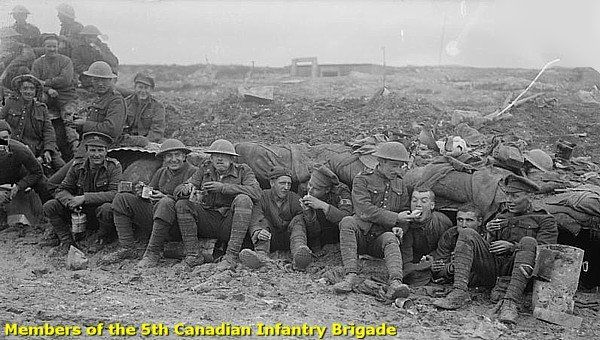
On 4 April the 2nd Canadian Division under Major-General Sir Richard Turner relieved the 3rd Division. Fifty men per company of the 5th Canadian Infantry Brigade wore for the first time the recently introduced steel Brodie helmet . On 5 April at 11:00 PM, the German artillery opened a three hour bombardment on the Canadian troops.
On 6 April at 3:30 AM German infantry attacked the British positions. Despite the response of British artillery fire and the failing Canadian infantry, the Germans captured the craters D1, D2, H4 and H1. The Canadian 31st Battalion defended successfully an attack at crater F in No Man’s Land. The Germans re-captured their original lines.
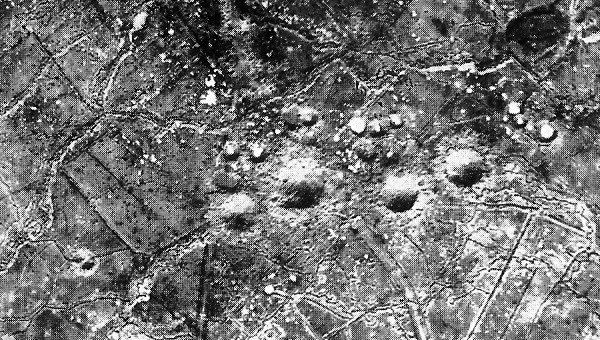
7 - 16 April
During the period of 7 - 16 April the battle focused on the possession of the craters D1 and D2. Several bomber teams of the Canadian Battalions of the 5th Canadian Brigade focused on the capture of these craters. After 10 days of mutual artillery bombardments and infantry attacks, the Germans consolidated their positions on 16 April in the four large craters in the centre. On the same day photographs made by air reconnaissance by the Royal Flying Corps showed that the Germans had dug a trench to the west of the craters. During the night of 17/18 April Major-General Turner cancelled all planned attacks. The 6th Canadian Brigade relieved the 5th Canadian Brigade. The Canadians consolidated their positions in the new front line, still overlooked by the 92. Reserve Infanterie Brigade.
Aftermath – Casualties
The 46th Reserve Division held the new line until it was moved to the Somme Front in August.
Although the estimations of the casualty numbers are not complete, the known numbers still give an indication of the losses.
German casualties: From 27–29 March, the casualties of the 46th Reserve Division were 1,122 men. The 300 soldiers of the Reserve Jäger Bataillon 18 were buried in the mine blasts and another 247 men were Missing In Action. During the following infantry attack 201 men of the R.J.B. 18 were taken prisoner.
During the successful attack on the mine craters of 6 April the 46th Reserve Division counted 66 men killed, 299 wounded and 118 missing.
British casualties: On 27 March, the 9th Brigade lost 117 men killed, 607 wounded and 126 missing. The casualties of the 4th Royal Fusiliers were 40 officers and 809 soldiers.
From 4 to 16 April the 2nd Canadian Division counted 1,373 casualties, 617 of them from the 6th Canadian Brigade.
August 1916 - Underground Warfare Continues
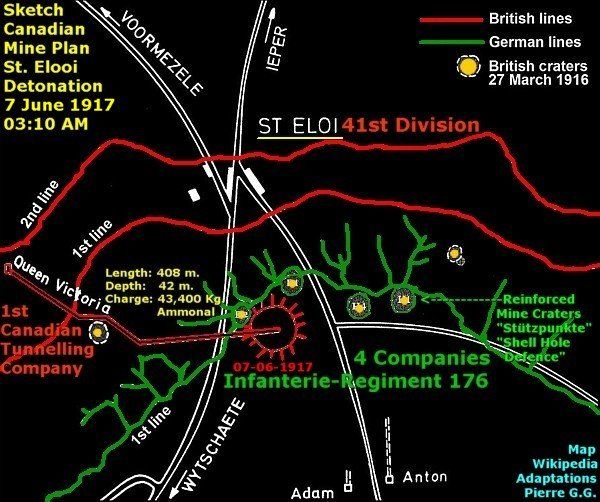
From March 1916 the 1st Canadian Tunnelling Company continued the mining operations at St Elooi. On 16 August 1916, in anticipation of the later Battle of Messines, the Canadian tunnellers begun to construct from Bus House Farm a mine gallery towards craters D1 and D2. The tunnel, named Queen Victoria, ran at a depth of 42 m. and had a length of 408 m. At the end of the gallery the tunnellers installed a charge 43,400 kg. of ammonal.
7 June 1917 - Detonation Queen Victoria Mine
| On 7 June 1917 at 3:10 AM, at the opening of the Battle of Messines, the 1st Canadian Tunnelling Company detonated the Queen Victoria mine, destroying completely the former craters D2 and D1. The detonation destroyed largely the 4 companies of the German Infanterie Regiment 176 . During the following infantry attack the 41st Division captured the German lines. ( Recommended literature about mine warfare: Simon Jones: “Underground Warfare – 1914-1918” and Peter Barton, Peter Doyle, Johan Vandewalle: “Beneath Flanders Fields - The Tunnellers' War 1914-18”) |
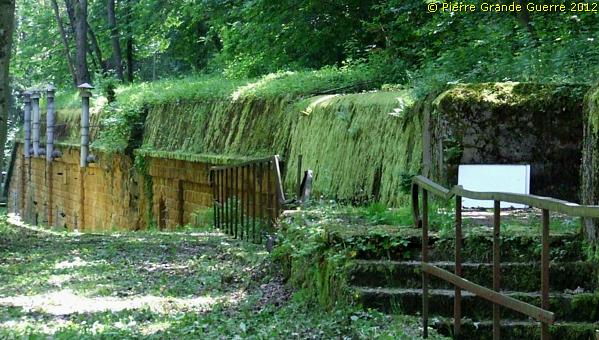
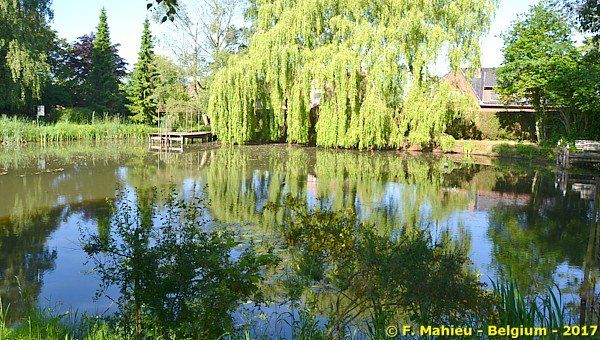
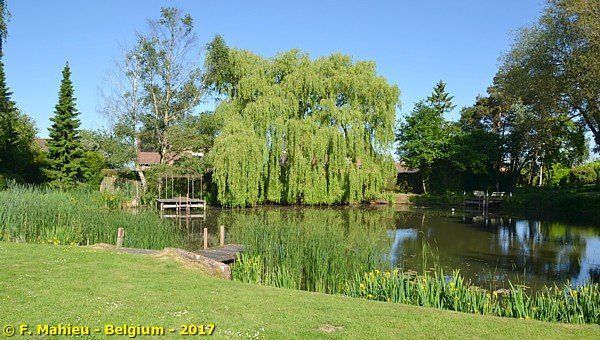
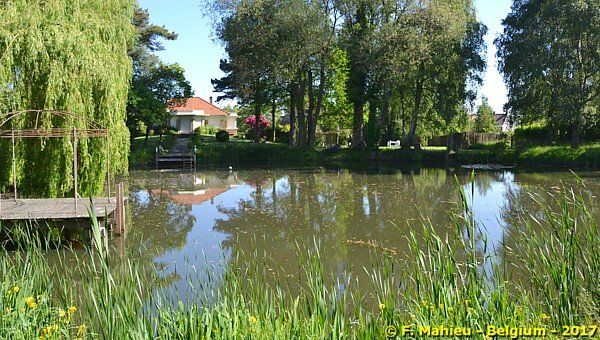
At the west side of the road a visit to the 1917 Queen Victoria Crater is possible via this gate after asking first the code of the lock at the Tourist Office of the St. Elooi. There is also a panel with a telephone number. You call this number and you will get the code instantly.
In May 2017 and on my request, my Belgian friend, Frank Mahieu, photographed the St. Eloi Crater from different angles. Grateful for his courtesy I show here Frank's photos.
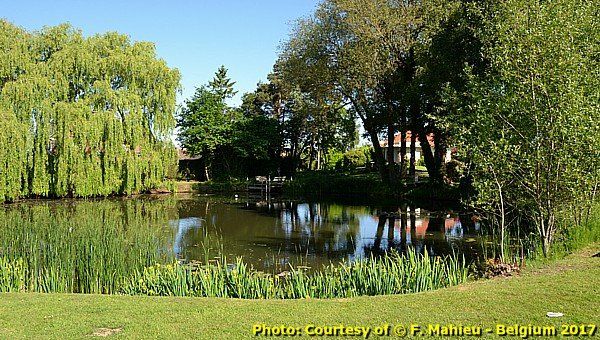

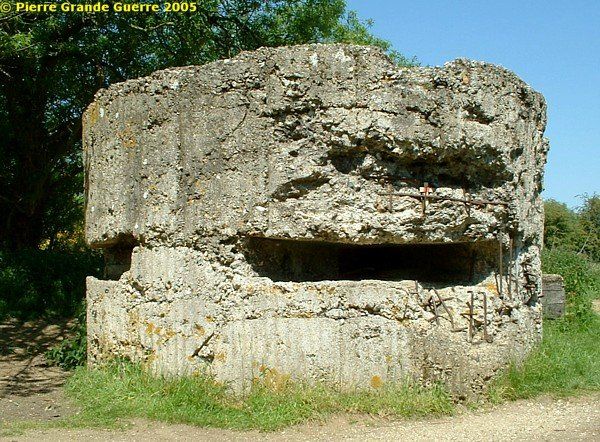
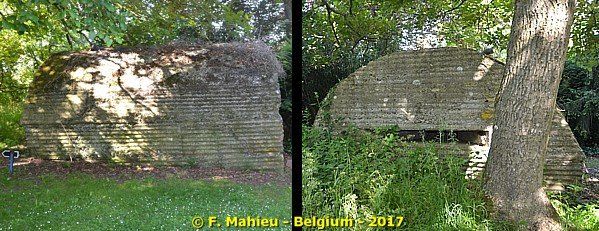
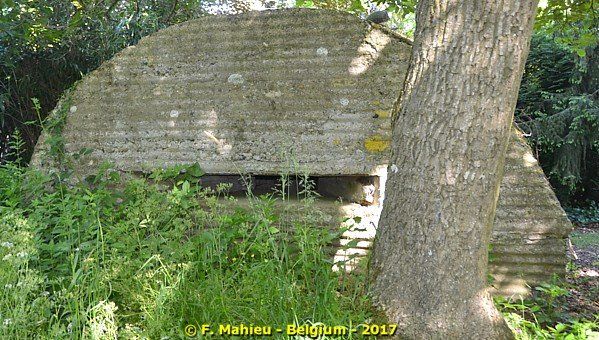
On the edge of the crater stands a bunker, probably an observation post.
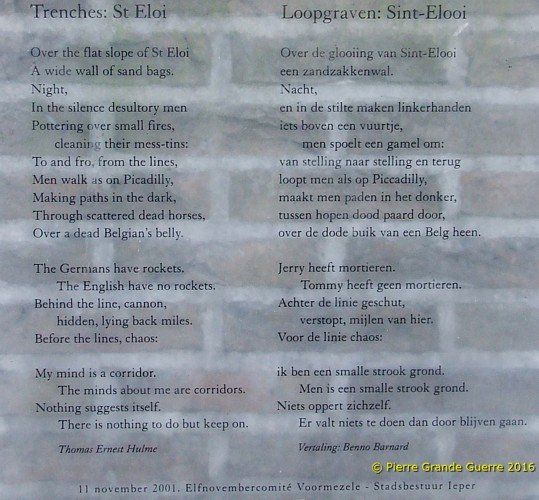
Next we visit, still on the west side of the road, near the roundabout north of the village, the memorial, commemorating the "Mine Warfare Battle of St. Elooi" and the "Actions of St. Eloi Craters".
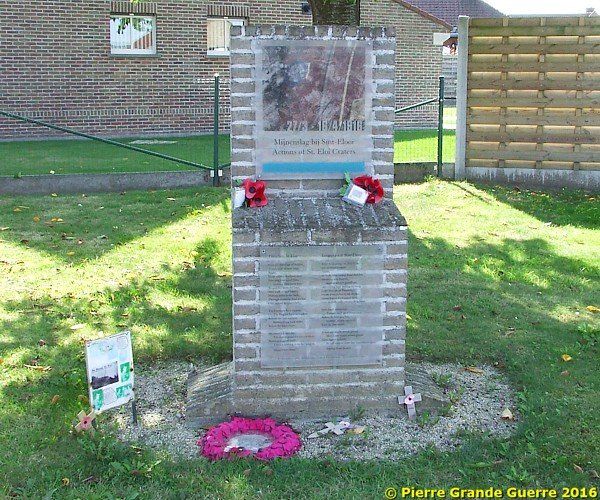
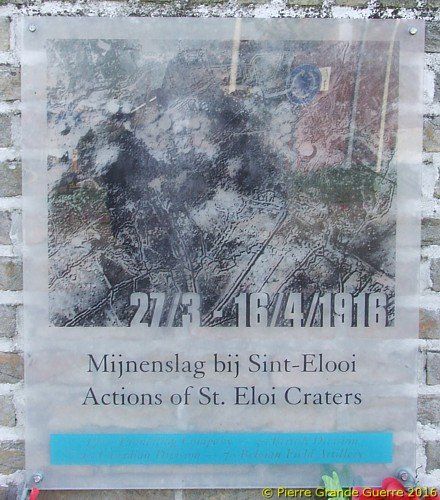
On the memorial we find the text of a poem of Lieutenant Thomas E. Hulme of the Honourable Artillery Company: "Trenches: St. Eloi". During the Battle of St. Eloi Hulme was wounded in the arm on 14 April 1915. On 28 September 1917 Hulme was killed at Nieuport .
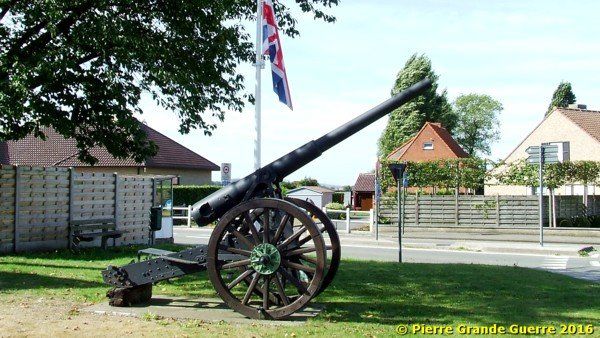
Next to the memorial stands a Krupp field gun.
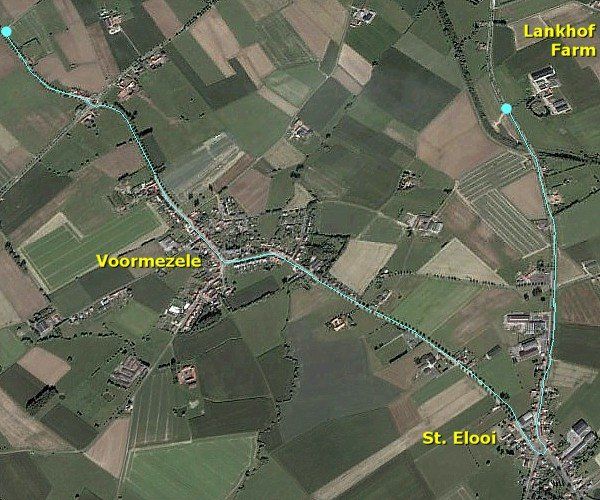
From the roundabout we continue in the direction of Voormezele.
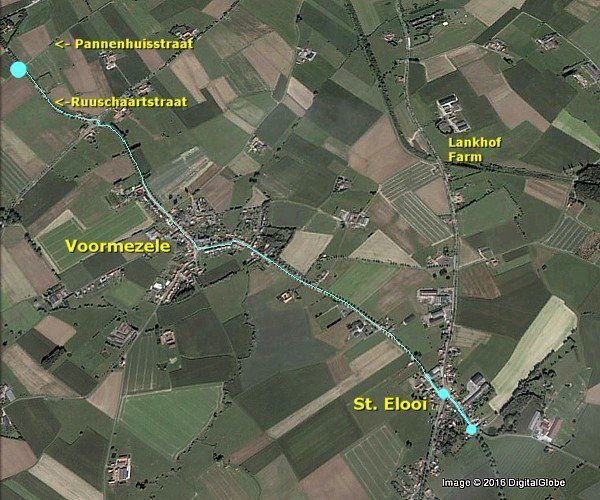
We pass this village to stop at the junction of the Ruuschaartstraat and the Pannenhuisstraat.
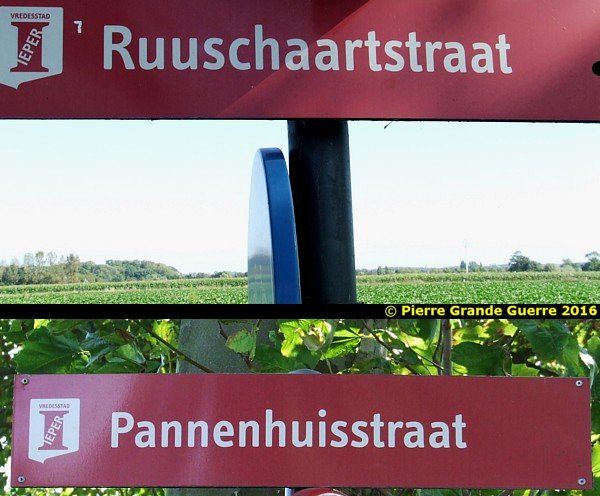
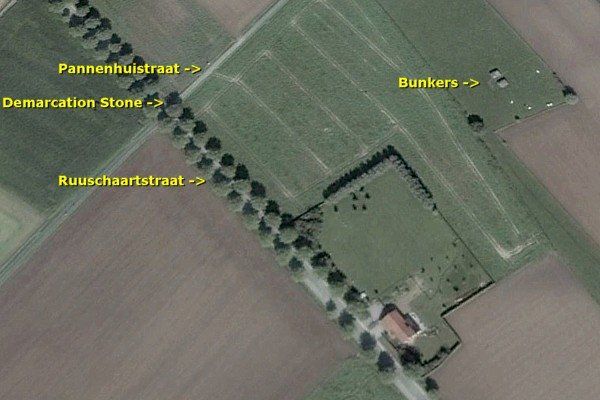
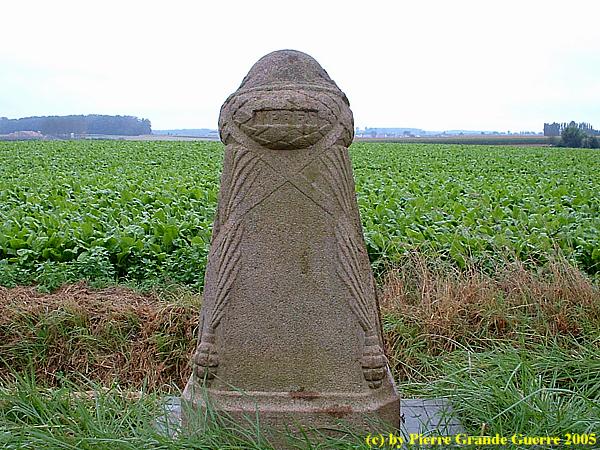
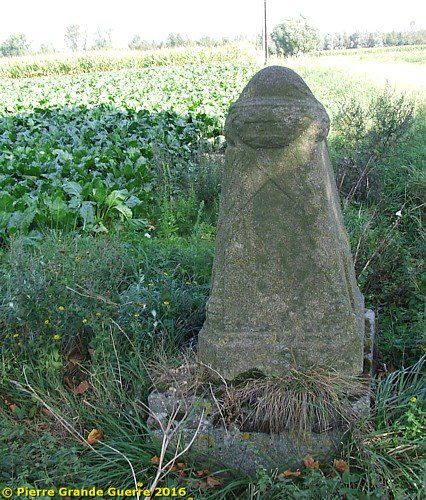
Here we find a post war demarcation stone.
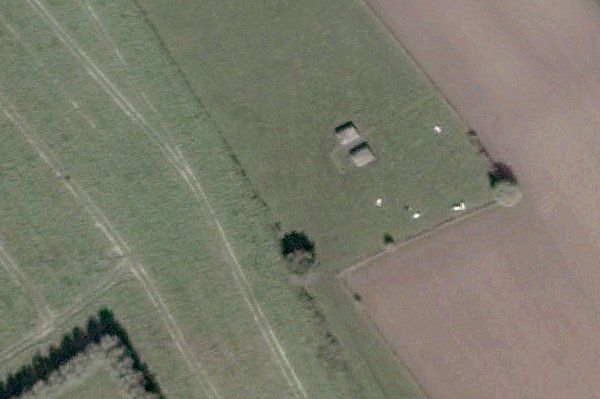
In the field, east of the demarcation stone, there are two British bunkers.
From here we return to the St. Elooi roundabout to continue in the direction of Ypres via the Rijsselsestraat or N 365. After 1,350 m. we arrive at our last stage of this tour: Lankhof Farm .
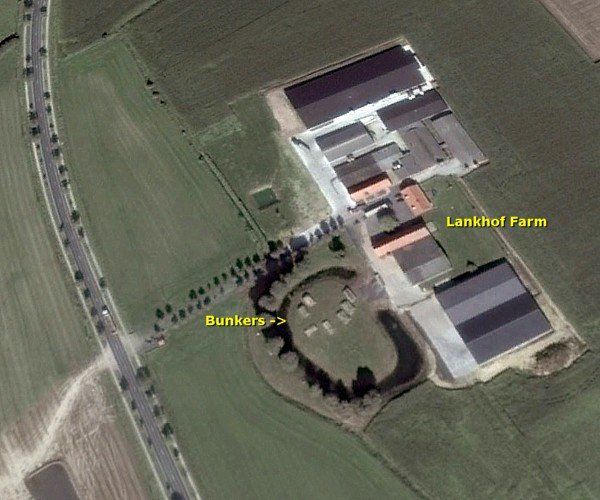
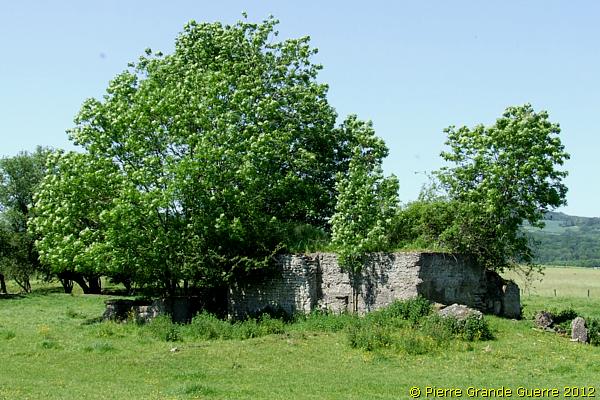
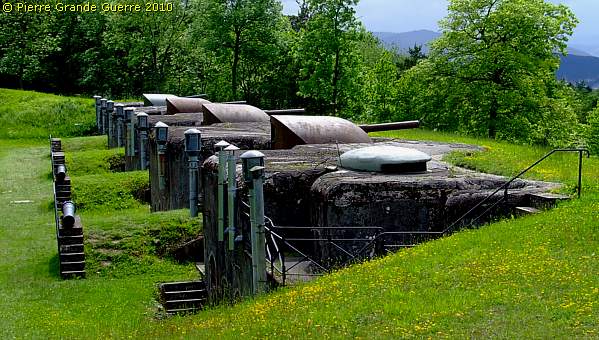
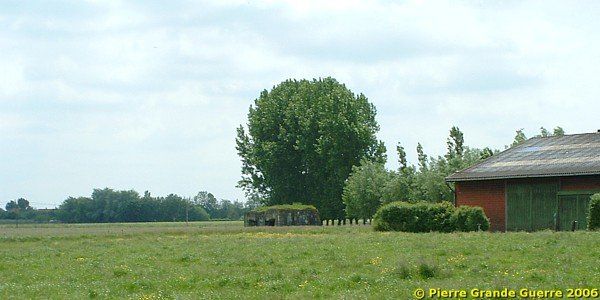
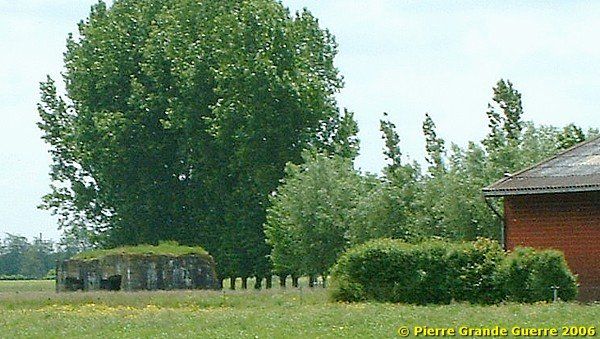
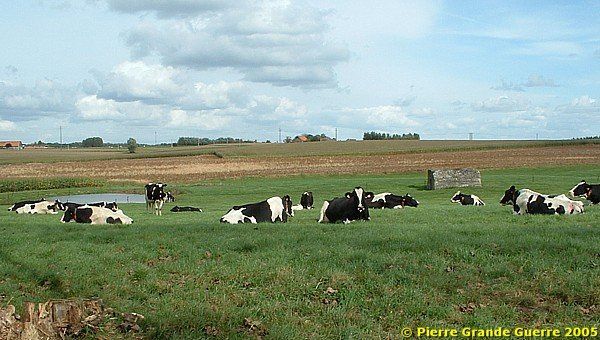
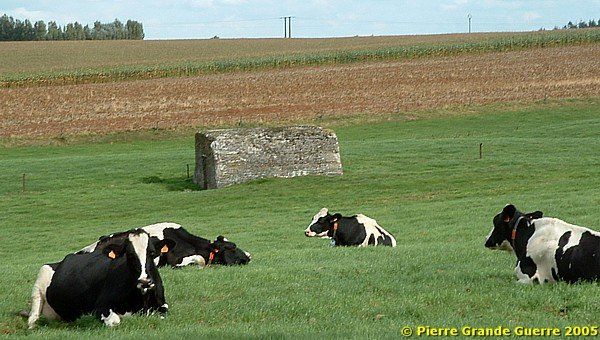
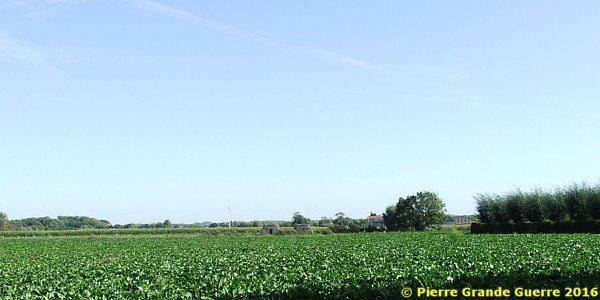
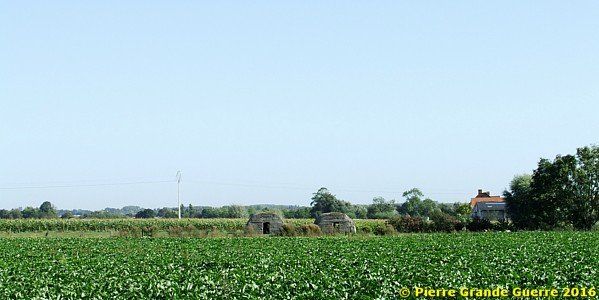
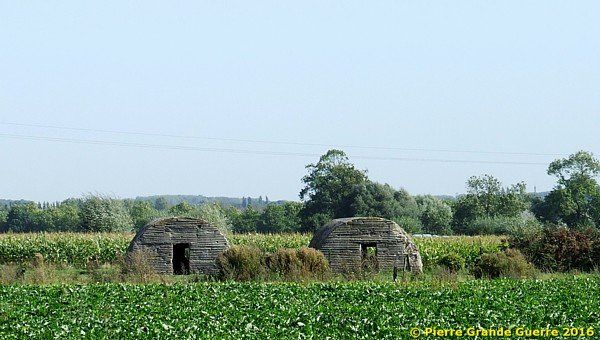
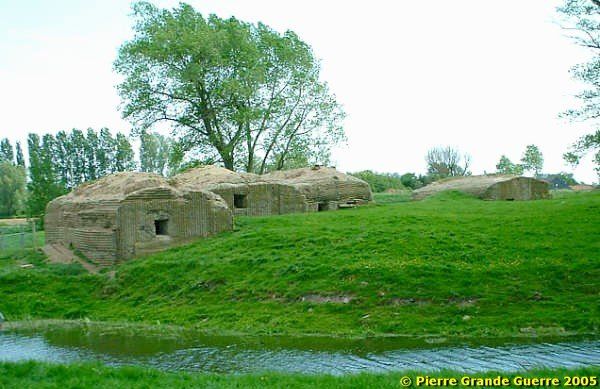
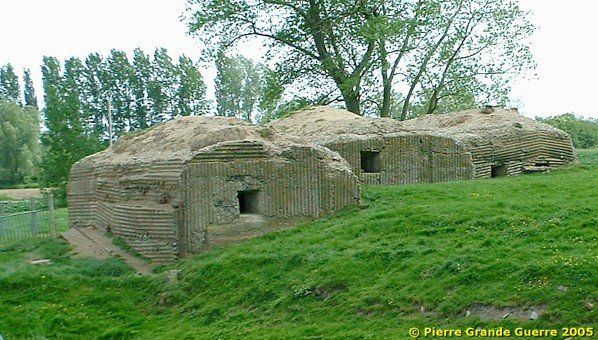
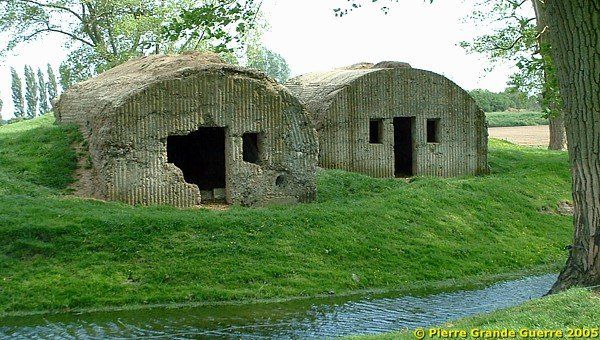
From the road we see on the private property of Lankhof Farm a small peninsula with seven British bunkers.
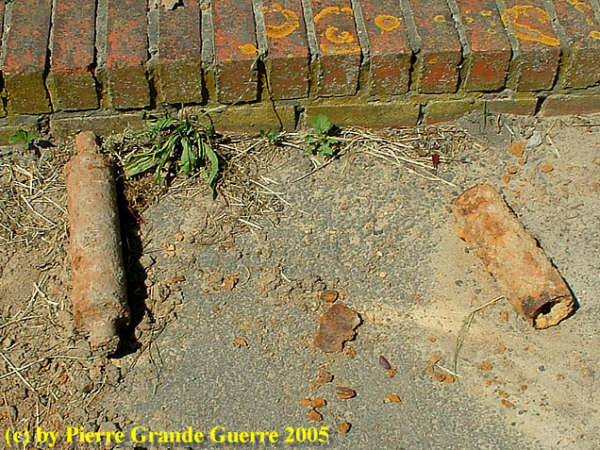
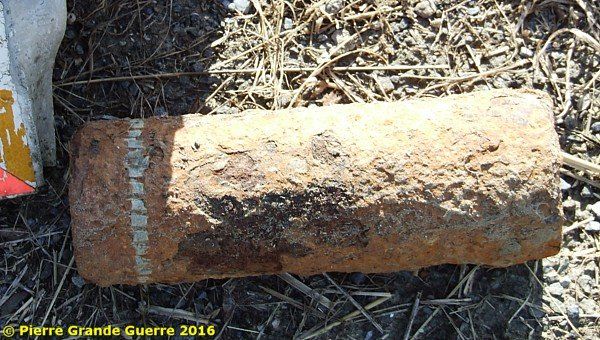
The farmer still finds artillery grenades from the war period.
S ometimes I receive reactions with the question why I prefer to show you my older photos instead of more recent ones? As you can see on this 2016 photo below the site has changed dramatically over the years with the addition of modern large agricultural sheds.
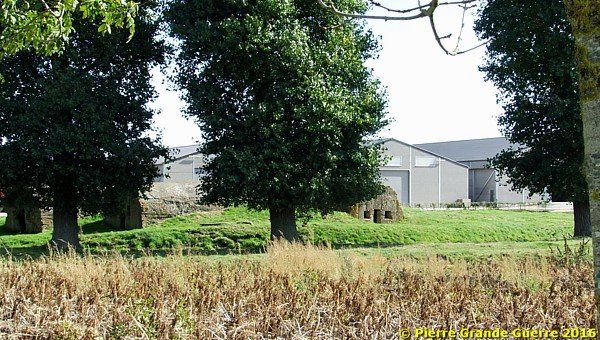
That is why I prefer to show you the situation of 2005, which offers a better impression of the Lankhof Farm bunkers.

After a visit to Lankhof Farm you might visit the large Bedford House Cemetery along the Rijsselsestraat.
On this website we continue our explorations of the underground war with a visit to Messines Ridge.
Continue to the next chapter: " Messines Ridge "